


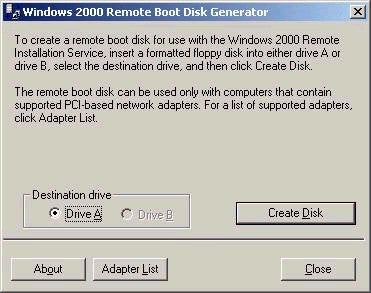
Note that if your client machines do not meet the specs above,
there is still hope. Windows 2000 includes support for a small
number of network cards that are not PXE-compliant. This support
allows a boot disk to be created that allows the PXE to be
emulated. In order to create this disk, the rbfg.exe utility must
be used (found at servernameREMINSTAdminI386RBFG.exe),
as shown below:
Outside of the PXE requirements listed above, the minimum hardware specifications for a RIS client computer include P166 or faster, minimum 32 MB RAM, and a 800MB or larger hard drive.
RIS is not installed by default on Windows 2000 Server, and must be added as an optional component via add/remove programs in Control Panel. The minimum hardware requirements for the RIS server include a P166, 128 MB RAM, 2GB partition for RIS folder tree (must be NTFS), a 10 or 100 MB network adapter, and either a CD-Rom drive or access to the Windows 2000 Professional source files. Once installed, RIS will add a number of services to the server, but will not actually be configured to hand out images (to be discussed shortly). The services added to the server during the RIS setup include:
BINL (Boot Information Negotiation Layer) – the BINL service ensures listens for DHCP/PXE requests from the client, passes the client the correct files, ensures that the proper RIS server handles the request (if pre-staged – more on that in a bit)
TFTPD (Trivial File Transfer Protocol Daemon) – this service is used by RIS to download the initial files needed by the client to start the remote installation process.
SIS (Single Instance Store) – This service reduces the space that RIS requires for saving images by creating a link to a duplicate file instead of another entire instance.
Once the actual RIS service has been installed, it must be configured using a tool called Risetup.exe (screen shot below).
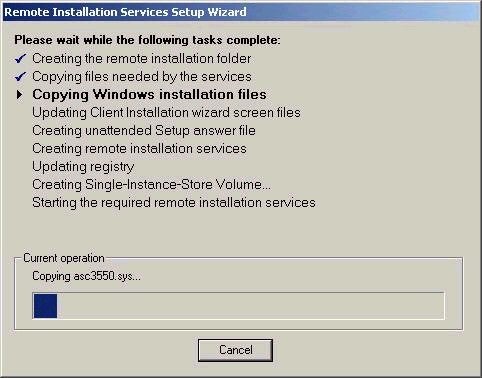
This wizard-based tool will actually lead you through the process of creating the initial image of Windows 2000 Professional, often called a CD-based image. The CD-based image must be created, even if you never intend to use it. The CD-based image is simply a normal installation of Windows 2000 Professional, which had been automated via RIS. Note that the wizard also asks you whether or not you wish for the RIS server to begin responding to client requests. It is a good idea to choose not to respond initially, until you are sure that everything has been configured correctly (proper images, etc)
For a higher degree of functionality, you will probably want to create images to be distributed via RIS that also include applications and related settings, similar to the binary images created with tools like Ghost. RIS provides a similar functionality, using a tool called Riprep.exe. After installing Windows 2000 Professional and associated applications on a system, you would run Riprep.exe (which is again a wizard-based tool) to copy the image to the RIS server. The Riprep tool is found at servernameREMINSTAdminI386riprep.exe. A couple of quick notes with respect to Riprep:
1. The systems to which you choose to deploy this image must have the same HAL (for example, an image created on a single-processor system could not be used for a dual-processor system)
2. The target system need not have the same hardware configuration as the system on which the image was created, since Plug and Play will detect hardware differences.
3. Similar to when you run sysprep, riprep will remove all system SIDs from the image created, ensuring that a new and unique SID is generated on the client computers.
One of the potential problem areas with RIS is that in theory anyone with a PXE-compliant system could attach it to the network and install an image. As such, you need to be concerned with configuring security properly. RIS supports 3 main security features:
1. Requiring that RIS server be authorized prior to receiving an image – much like DHCP, a RIS server must be authorized in Active Directory by a member of Enterprise Admins. RIS server authorization is done using the DHCP tool, following the same steps as authorizing a DHCP server.
2. Using Active Directory Users and Computers – Use this tool to control who can install an image, whether the RIS server responds to requests, defining a naming convention for client computers, and pre-staging client computers. By accessing the properties of the computer object acting as the RIS server, all of these settings can be controlled. For example, to use the client installation wizard that will start when a RIS image is requested, the user must have read access to the OU where the computer account will be created, as well as permission to create user accounts (unless the account had been pre-staged in advance)
3. Using group policy to manage client installation options – these options allow the administrator to control the level of access that a user has over the installation wizard that runs as part of the image installation process. The four options available are:
Automatic Setup: if chosen, this option uses the administrator-supplied settings, and the user is not given any client installation wizard choices.
Custom Setup: if chosen, allows the user to define a computer name and specify where the computer account will be created in AD.
Restart Setup: if chosen, this option will restart a setup if it fails before completion.
Tools: if chosen, this option provides access to maintenance tools such as disk utilities for example.
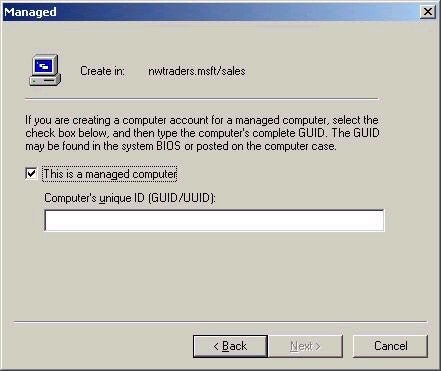
In scenarios where you don’t want unknown clients to be provided images by RIS, your best defense is to pre-stage client computers. This process pre-creates computer accounts in advance, and associates all computer accounts with a unique identifier referred to as a Globally Unique Identifier (GUID), a unique 128-bit number. By default, the GUID will be stored in the BIOS of a NetPC or PC98 computer. Prestaging the account (which stores the GUID along with the computer account in AD) ensures that only the system that has the associated GUID can use the account. This also helps circumvent having to give users the ability to create accounts in Active Directory. For maximum security, configure the RIS server to only respond to clients that have been pre-staged. The GUID for a client system can usually be found in the BIOS, but is sometimes found on a label on the case of a PC. If you cannot find the GUID, start a manual RIS installation and record the GUID that appears onscreen. You could also sniff the network for a DHCPDiscover packet from the client, which will also contain the GUID. If the system does not have a GUID, you can use the MAC address of the system padded with leading zeros as the GUID for prestaging purposes. The example below shows the screen you could expect when creating a new computer account in a RIS-based environment.
And there finishes the Active Directory portion
of the series. Next week I’ll begin my look at the networking services
portion of the exam, which should last approximately 8 articles. Thanks
for continuing to support the series. As always, feel free to contact me
with your comments and questions, but please post your technical
questions to my message board. Until next week, best of luck with your
studies.
Dan