– Adding exclusions. An exclusion is a group of IP addresses from within the provided range that you wish to not be handed out by the scope. Often these addresses are ones which you have statically assigned to hosts (such as servers) on the given subnet.
– Lease duration. Unlike in NT 4 where the lease duration was 72 hours (3 days) by default, the lease duration in Windows 2000 is now 8 days (this can of course be changed)
– Configure Options. The last portion of the wizard allows you to configure DHCP scope options, such as providing the IP address of the gateway or DNS server for example. These will be further described in a moment.
Note that by default, your DHCP scope will not be activated until you explicitly choose to do so (by right-clicking and choosing Activate), unless you choose to configure options with the wizard, in which case the last option allows you to activate the scope. Remember that the DHCP request message sent out by clients is a broadcast, and as such will not be passed beyond the local subnet unless you routers are configured to do BOOTP forwarding (sometimes called an IP Helper address). If you are using Windows 2000
RRAS, you can set up the DHCP Relay Agent to forward DHCP broadcasts to DHCP servers on different subnets. If you do not have a DHCP relay agent (or similar) on your network, you will need to configure at least one DHCP server per subnet to handle client requests.
A few additional things about a scope that you should be aware of:
– You can now control whether a scope you create answers DHCP clients, BOOTP clients, or both.
– If you want to view which addresses in a scope have been leased to clients, check the ‘Address Leases’ section for a scope. This will provide information as to the leased address, the name of the system to who the lease is issued, as well as the lease expiration time.
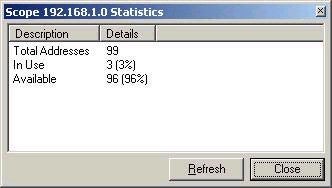
– For any given scope, you can view statistics on available and leased addresses quickly by choosing the ‘Display Statistics’ option, as shown
below
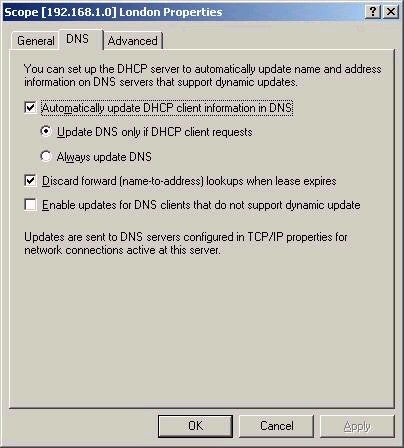
– As mentioned in earlier DNS articles, a
Windows 2000 DHCP Server can be configured to
handle client registrations in DNS. This is
especially useful for situations where the client
system is not capable of using dynamic DNS
directly. This functionality is enabled on a
scope-by-scope basis, and is configured via the
DNS tab in the properties of a scope, as shown
below:
Another new capability in Windows 2000 is the ability to grant a user the ability to manage a DHCP server, by making them a member of the DHCP Administrators group. This allows the user to control all DHCP properties, such as creating scopes, client reservations and so forth (they cannot authorize a server, though). For the purpose of letting a group of users view the information provided by the DHCP Server, a group called DHCP Users also exists. This is handy for situations where I only want level one support to view and perhaps diagnose, because members of this group have read-only access to the DHCP information.
Configuring options
An important part of configuring your DHCP server is configuring the options that will be included along with the IP address and subnet mask when a client makes a request. Although there were many options defined in the original DHCP specification, in reality you’ll only probably use a handful of them. I have covered the most popular ones below:
003 – Router – this option specifies the default gateway address (or addresses) to be assigned to the client, in order of preference.
006 – DNS Servers – this option specifies the IP address of DNS Servers that you wish the client to use for host name resolution, again in order of preference.
015 – DNS Domain Name – this option specifies the domain name that the client should use when resolving host names using DNS.
044 – WINS / NBNS Servers – this option specifies the IP address WINS servers to be used for Netbios name resolution.
046 – WINS / NBT Node Type – this option specifies the node type, which controls in what order the client will attempt to resolve a Netbios name to an IP address. Usually this is set to option 0x8 (h-node or hybrid) when a WINS server is used.
Note that the options above fall into the category of standard options. A new type of option, called vendor specific options also exist in Windows 2000, accessible via the advanced option tab. The Microsoft Options that you should be aware of are listed below. Note that all of these are supported on Windows 2000 clients, but may not be supported for other vendors’ systems. It is possible to add additional vendor classes, much the same as adding user classes, which will be defined shortly.
001 – Microsoft Disable Netbios Option – this option allows you to use DHCP to disable Netbios functionality on Windows 2000 clients.
002 – Microsoft Release IP Address on Shutdown Option – as the name suggests, if this option is allocated, a Windows 2000 DHCP client will fully release its IP address on shutdown, regardless of the lease duration.
003 – Microsoft Default Router Metric Base – allows you to set a default router metric, a value to be assigned to default gateway addresses on the DHCP client, used for calculating the fastest or least expensive route.
The final type of option that can be defined is what is referred to as a user class option. A user class option is one that can be created and defined. For example, I could create a special user class called ‘laptop’ and define it in DHCP, as shown
below
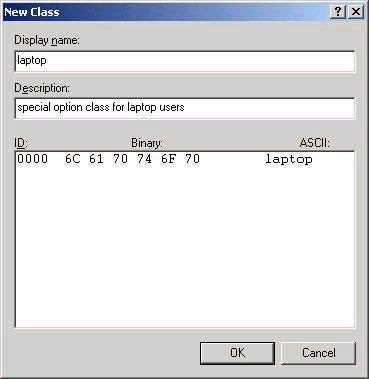
So why would I want to do this? Simple. After defining a new class, I can then provide special options to clients of that same class. For example, I might decide that all systems that have a class ID of ‘laptop’ would have the option to release their IP address on shutdown set. But how do I set the class ID on the actual client? Simple – by using the ipconfig
/setclassid command on the client. The syntax of the command is shown below:
Ipconfig /setclassid * laptop
This command will set the class ID on all my client’s network adapters to ‘laptop’. As such, when I request an IP address, I will also let the DHCP server know that I should receive all options meant for the user class ‘laptop’ as well. If the command is issued without the ‘laptop’ part, it removes the class ID from the system.
Now that you are aware of the different options that can be offered to a client, if is essential that you understand the different ways these can be allocated. The levels at which options can be allocated are Server, Scope, and Client. Options configured at the Server level apply to all scopes on the server. This provides an easy way to allocate common options, such as the address of a DNS server. Options configured at the scope level only apply to that particular scope. Finally, options configured on a client reservation apply only to the client reservation itself. In the event of conflicting settings, Server options are overridden by Scope options, which are overridden by Client options.