


By Ed Baker, Windows Server Instructor at Firebrand Training
With the advent of cloud computing and mass virtualization of server operating systems, the need for high speed, highly available networking becomes even more pressing. Until now, in a Windows Server environment, the joining together of Network Interface Cards (NICs) into teams was a tricky and time consuming process. It required third-party drivers, specific NICs and some rather technical configurations to get it all right.
So what is a team? The teaming of network cards is simply joining them into one logical entity, with a single IP address. Having done this, you can choose how you want to use this new team.
There are many reasons for teaming your multi-homed servers. Primarily because the networking becomes highly available, you can also lose one of the NICs and still communicate. The team can be set to perform several other functions, including bonding the two bandwidths together and doubling the potential throughput of your connection.
NIC Teaming in Windows Server 2012
The great thing about NIC teaming is that it is included in the box, free, and will work on any NIC that works with Windows Server 2012. It is remotely configurable and remains the same process no matter what card you use. Obviously you need a server and at least two NICs.
A team in Server 2012 can comprise two or more NICs from one or more vendors. The team can be added to after creation, and this is achievable from a Windows 8 client remotely on a Server 2012 machine – with or without a GUI on the server. The whole process is underpinned by PowerShell 3.0.
For the purpose of this guide, I will have three servers:
1. DC and DHCP server (single NIC)
2. Hydrangea (to be teamed, member of the domain)
3. Dahlia (to be teamed, member of the domain)
Of course all of this can be achieved using Virtual Servers. My setup was carried out on a Dell Laptop using Windows 8 RTM with Hyper-V.
Where to begin
It would be normal to use static IP addresses for all servers (or most of them), and certainly on a team of NICs. It is just as easy to use DHCP too, Server 2012 will allow that and I will use DHCP to ease the configuration.
So make sure you have a functional Server 2012 with a DHCP scope available to it (can be installed as a role on the server, or be available somewhere else on your network). If you have no DHCP, then you will need to manually assign IP addresses to your teams when you create them.
As a quick test of your current network configuration, run PowerShell 3.0 and enter the following commands:
RESOLVE-DNSNAME Hydrangea
RESOLVE-DNSNAME Dahlia
(The results of these Cmdlets show that each server has two NICs and two IP addresses – showing that the NICs are NOT teamed).
Now team the NICs on each server
This can be performed remotely from the DC. Run Server Manager and select All Servers, right-click Hydrangea and select Configure NIC Teaming, the dialog box that is presented allows all teaming activities.
Ensure the server is selected under Servers, and under Teams select Tasks and click on New Team.
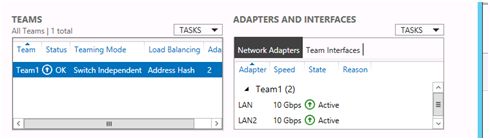
Enter the Team Name – I used the creative name of “Team1” – then simply select the NICs you want to include in your team (minimum of two). Then select Additional Properties to choose how you want to set-up your team.
Now here are the really powerful settings. You can choose to be Switch dependent or independent, if redundant switches are important to you. You can choose if you want a standby adaptor or if you want all adaptors included and active. Finally, you can choose the VLAN you want this Team to operate on.
Select your options (Switch independent, None [for standby] and Default VLAN), then click OK. This will take a couple of minutes and will cause a loss of connectivity to the server you are managing (you are changing its IP address). To reconnect, you need to delete your local DNS cache and refresh server manager and all will be well (PowerShell – enter Clear-DNSClientCache and Resolve-DNSName ). This will show that you now have only one IP address and a single interface.
Repeat this set of steps on your second server. You now have a pair of teamed servers.
The way to test the teaming is quite simple, but does involve more PowerShell 3.0

First, on your equivalent of my Hydrangea server, run a PowerShell window and type Ping -t DC (where DC is your DC server name) this will keep pinging the DC until you tell it to stop, leave the window open.
Open another PowerShell window and set it side-by-side with the ping window. My NICs were called LAN and LAN2, you will need to use your correct naming in the below commands:
Get-netadapter
Disable-NetAdapter –Name “LAN” –Confirm:$False
After the first disable command – notice that the ping is still working fine
Disable-NetAdapter –Name “LAN2” –Confirm:$False
and only fails after the second disable command.
Enable-NetAdapter –Name “LAN” –Confirm:$False
Enable-NetAdapter –Name “LAN2” –Confirm:$False
Once NICs are re-enabled, all goes back to normal (in-fact comms are restored when the first NIC is re-enabled).
Summary
Prior to the release of Windows Server 2012, to be able to implement NIC teaming required several prerequisites:
1. NICs of the same make and model, and often of the same firmware revision
2. Third-party drivers built specifically for teaming
3. Skills in configuring the specific NICs and drivers.
With this groundbreaking release, Microsoft has provided all the functionality in the box for free – and removed all of the above.
Your NICs can be any make, model or revision; provided it works with Server 2012, the drivers all have the functionality built in.
The real USP is the fact that this can be done remotely on any number of servers through Server Manager and of course through PowerShell 3.0.