


Implementing a virtual desktop infrastructure (VDI) requires both a hardware and a software solution. On the software side, there are a multitude of players including Citrix, Red Hat and VMware. With the right server hardware, you can also implement a VDI solution using Microsoft’s Windows Server 2008 R2 SP1. Microsoft’s Remote FX technology has specific requirements on the server to fully support its implementation.
From a hardware perspective, you have several possible paths, including the repurposing of old client machines or purchasing new thin-client hardware. Microsoft’s Windows Thin PC offering was designed for repurposing, should you want to go that route. Hardware vendors of thin-client devices include HP, NComputing and Wyse.
This review will focus on the L300 device from NComputing.
Package Deal
When you purchase an L300, you receive the hardware device plus a software license for both the NComputing client software and its proprietary protocol. NComputing has taken a controlled approach to implementation with an eye toward performance, specifically in the area of video. Part of that control is the use of its proprietary User Extension Protocol (UXP). Put it all together, and the L300 “package” is capable of producing full-frame 1080P video to a 1920 X 1080 display.
NComputing’s client software is called VSpace. It loads on the host machine that will serve as the remote computing device for connecting remote systems. vSpace can be loaded on any number of different operating systems, including Windows Server 2003 or 2008, Windows XP and Windows 7 64-bit. When you load vSpace onto a server operating system, you effectively get a one-to-many configuration with one server able to support multiple clients. As an alternative, you can load vSpace on a virtual machine (VM) and provide one-to-one support for individual machines.
Installing vSpace
On the hardware side, the installation process consists of connecting a VGA monitor and a USB keyboard and mouse. Audio jacks are also provided for a microphone and speakers, should that be required. Software installation requires VSpace software be loaded on either a server or client machine. This is where the options get somewhat complex. If the target environment is Windows Server, simply install the vSpace software (one time) on the host machine. Windows licensing is based on Terminal Server Client Access Licenses (CALs). These are typically much less expensive than individual licenses for an operating system, such as Windows 7.
For a VM one-to-one installation, you must load a copy of vSpace into each individual VM. The best practice here would be to configure one VM with the operating system and a copy of vSpace and then clone that VM for additional users. This method is supported for Citrix Xenserver, Microsoft Hyper-V and VMware.
For a Linux host, the process is a little more involved. Installation on Ubuntu Desktop 10.04 consists of installing two separate packages. The installation instructions from NComputing assume a clean install as a starting point for 10.04 LTS. This method would work for a VM in the one-to-one scenario as well. OpenSUSE is also supported with a similar installation.
A few hardware options can be changed from the initial vSpace boot screen. One of these is the screen resolution. After the device finishes its power-up cycle, you should see a screen with several available buttons. One of these is “configure,” and it will present a list of monitor resolution options once you click on it (see Figure 1).
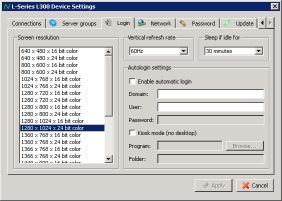
Figure 1 — NComputing’s Monitor Resolution Options
vSpace Management
One of the nice thing about thin-client devices is that they require very little in the way of care and feeding. NComputing provides a management console for viewing the current status of all devices on your network (see Figure 2). The vSpace software handles all firmware updates transparently. For large installations, it makes sense to distribute the server software across multiple physical devices. Once you are connected to a vSpace console instance you can easily add additional servers for monitoring purposes.
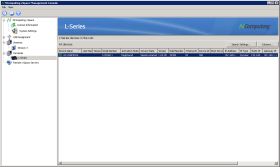
Figure 2 — Device Status View
From a network management perspective there’s really not much to do. You can assign static IP addresses for each device individually, should you choose, but it’s not a requirement. Beyond that, you shouldn’t have to do anything other than connect the devices to a network switch. NComputing recommends at least a Gigabit connection on the server side.
Bottom Line
NComputing’s L300 is a cost-effective VDI solution suitable for most typical workloads but especially any scenario with a requirement for high-fidelity video. The minimal management requirement should appeal to any organization looking for a low-maintenance VDI solution.