

Last year, we built a DIY Linux workstation with an eye toward creating a high-end development machine with the ability to run multiple virtual machines at the same time. Now, we’re going to build a machine fit for testing server operating systems to include functioning as a KVM or Xen virtual host. The other goal is to have a flexible machine capable of being quickly reconfigured for testing purposes. As new versions of operating systems are released, they must be tested with any custom software applications before being putt into production. Our DIY server will, hopefully, fulfill this role perfectly.
If you’re short on cash but looking for a server to test operating systems and virtual environments or a flexible machine capable of being quickly reconfigured for testing purposes, consider building your own. Here’s how.
One of the accessories you absolutely have to have if you must frequently swap hard drives is an external disk docking station. These handy devices look kind of like a toaster where you insert the hard drive into a slot and press an eject button to release it. When we looked around for a case to host our test server, we came across the Thermaltake V9 BlacX. This case has two hard drive receptacles built right into the top (see Figure 1), providing quick swap-out functionality we’re looking for without another external device.
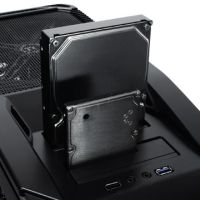 |
| Figure 1 The Thermaltake V9 BlacX Case (Click for larger image) |
Another feature of the Thermaltake V9 BlacX case is USB 3.0. There’s a USB 3.0 connector on the top, giving you quick access to the high-speed data port without the need to access the rear of the case. A nice blue cable from the front panel connector exits the rear of the case so you can plug it into one of the external USB 3.0 jacks on the back panel (see Figure 2). Internally, there’s plenty room for lots of disk drives. With storage prices constantly dropping, it’s easy to build a server with lots of storage without busting your budget. Quick no-tool release mechanisms add another dimension to the flexibility theme.
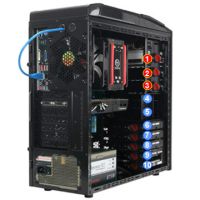 |
| Figure 2 The Thermaltake V9 BlacX Case, Back Panel (Click for larger image) |
When it comes to a CPU-Motherboard combination, there are more options to choose from than you probably have time to sort through. The primary criteria for our test server machine were a multicore CPU and a motherboard supporting up to 16 GB of memory and USB 3.0. AMD graciously provided one of its six-core X6 1090T CPUs on an Asus M4A89GTD Pro motherboard for our project (see Figure 3). The CPU definitely fits our multi-core requirement, and the motherboard has the memory and USB 3.0 support we wanted. It has six SATA ports for connecting lots of storage.
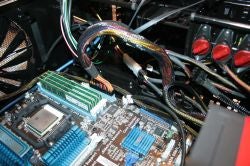 |
| Figure 3 AMD’s six-core X6 1090T CPUs on an Asus M4A89GTD Pro Motherboard (Click for larger image) |
Thermaltake also supplied us with a CPU cooler (see Figure 4). It’s absolutely critical to adequately cool your CPU if you want it to last for any length of time. The Thermaltake Jing cooler delivers efficient cooling while at the same time keeping things quiet. You’ll want to follow the directions when it comes to applying the thermal grease as this step can make the difference in your CPU cooler functioning properly or not. It’s also important to get the fans plugged into the right place on your motherboard. There’s a nice step-by-step guide that comes with the Jing to help get your through the whole process.
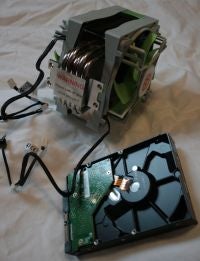 |
| Figure 4 Thermaltake CPU Cooler (Click for larger image) |
A high-end CPU and motherboard along with a potentially large number of disk drives demands a heavy-duty power supply. Thermaltake came to the rescue here providing us with their Toughpower Grand (TPG) 750W power supply. This unit outputs almost twice the power you would expect to get from a typical off-the-shelf unit. The TPG power supply uses the modular connector approach to give you added flexibility when it comes to providing power to just about anything you would need to drive. An ample supply of cables with multiple connectors comes with every TPG unit and more than met our needs (see Figure 5). Another nice touch with this unit is the mounting pads meant to help isolate the power supply from the case. This helps cut down on any extra vibration the power supply might introduce due to its fan.
The Asus M4A89GTD Pro motherboard accepts DDR3 memory in a number of different speeds. Crucial provided us two of their CT2KIT51264BA1339 8GB memory kits to meet our 16GB memory requirement. Installation is simple as long as you don’t have the CPU fan installed yet. While it’s not impossible to get the memory in later, it’s much easier if you install it before the CPU cooler.
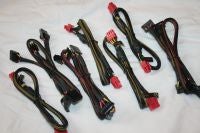 |
| Figure 5 The Cabling (Click for larger image) |
Our goal was to build a machine capable of performing well both as a virtual machine host and as a server test bed. To do both jobs well, you need lots of memory and multiple cores. This combination of case, CPU, memory and motherboard should provide all we need to build our test server machine. The one thing we haven’t talked about yet is storage. Next time we’ll take an in-depth look at options from solid state disks (SSD) to hybrid drives for the boot device and reliable drives for our storage array.


Paul Ferrill has been writing in the computer trade press for over 25 years. He got his start writing networking reviews for PC Magazine on products like LANtastic and early versions of Novell Netware. He's been using and writing about Unix / Linux since before there was a Linux. Print publication credits include Datamation, Federal Computer Week, Information Week, InfoWorld, Network Computing, Network World, PC Magazine, and PC Computing. He's written for multiple web sites including IBM's Developerworks site. He recently had his first book published by Apress entitled "Pro Android Python with SL4A". Paul holds both BSEE and MSEE degrees and has written software for more computer platforms and architectures than he can remember.
Property of TechnologyAdvice. © 2025 TechnologyAdvice. All Rights Reserved
Advertiser Disclosure: Some of the products that appear on this site are from companies from which TechnologyAdvice receives compensation. This compensation may impact how and where products appear on this site including, for example, the order in which they appear. TechnologyAdvice does not include all companies or all types of products available in the marketplace.