

Why would you ever want to run a server operating system on a laptop you say? For one thing, it allows you to have a portable system for training and experimentation without the need to be connected to a network.
It also gives you a “real” system for developing and testing administration scripts in an isolated environment. Both of these reasons should appeal to any IT administrator trying to get up to speed with Microsoft’s Windows Server 2012.
 In this article we’ll look at the steps necessary to get Windows Server 2012 up and running on a Toshiba Portege R930. This laptop is particularly well-suited to the task, as it comes with an Intel Core i7-3520M CPU along with two USB3 ports and an eSATA port. We were also provided with 16 GB of RAM from Crucial and a hybrid 500 GB SATA drive from Seagate to use for the project.
Upgrading the RAM and hard drive require removing a few screws on the bottom of the unit. Toshiba makes it easy to get to both with separate compartments and removable covers. If you attempt the same kind of upgrades you’ll want to take care that you don’t damage any sensitive electronics through electrostatic discharge.
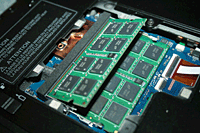 Our Portege R930 came with a single 4GB RAM chip that we removed and replaced with the new 8GB ones provided by Crucial (see figure 1 — and click on the thumbnail for a larger image). Replacing the hard drive was almost as simple.
To access the hard disk you must remove a second cover plate (see figure 2) and then disconnect the single connector. The stock hard drive is an SSD, which we’ll save for later when we convert the laptop back to a Windows 7 machine.
While the Portege 920 is a thin and light unit, it still comes with a DVD drive as standard equipment. This makes installing the software from a DVD a snap. 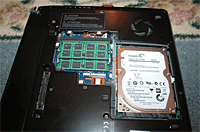 For this installation it makes sense to install the graphical version of Windows Server 2012.
We also chose to go with Windows Server 2012 DataCenter to make it possible to run more than two virtual machines on the laptop. Sixteen gigabytes of memory is more than enough to run three or four VMs, and you probably need at least one to provide the domain controller (DC) role.
With the base operating system installed, add new roles and features using Server Manager. This utility will launch by default when you log in to the system. It’s also available from the desktop by clicking on the icon in the taskbar that looks like a little computer tower with a toolbox in front of it.
Server Manager is the primary tool for all system management-related information. You can quickly view the status of your system by clicking on the Local Server item or by launching any of the management tools from the Tools menu.  Add new roles or features either through a wizard available under the Manage menu item or by launching PowerShell and using the command line.
Figure 3 shows the Properties pane displayed for our Toshiba laptop server when you click on the Local Server item in Server Manager. You’ll likely want to change a few things on this page.
First is the Computer name at the top left of the pane. Every changeable item is displayed in a blue font indicating it’s a clickable link. 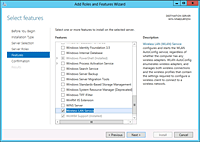 By default, the Remote Desktop option is disabled, so you’ll want to change that to access the system remotely. Other items we changed included Windows Update (set to automatic), IE Enhanced Security Configuration (set to Off for Administrators) and the Time Zone.
The first thing you want to do after installing the operating system is to update the system with patches and drivers. Fortunately, the wired Ethernet worked right off the bat. This made it easy to connect to the network and run the update process.
 If you want to use Wi-Fi, you’ll need to open up Server Manager to enable wireless networking. From there, launch the Add Roles and Features wizard from the Manage menu. Click the Next button until you get to the Features menu and then scroll down until you see Wireless LAN Service (see figure 4). Check the box next to this item and finish out the wizard.
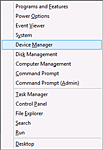
The installation and update process will not install drivers for all devices. A quick way to find out what’s missing is to use the Windows-X key combination 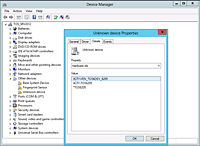 to launch the Advanced Context menu (see figure 5). Choose the Device Manager option to see which devices have missing drivers.
Figure 6 shows three items under “Other Devices” and the property page for the “Unknown device.” A quick Google search for “ACPI TOS6205” shows that this is the Bluetooth device. Downloading and installing the 64-bit driver from Toshiba will fix the problem.
At this point the system is fully configured and ready for testing. You can follow these same basic steps with any recent 64-bit capable laptop to build a portable server. More memory is always better, and the Toshiba Portege R930 makes a great choice in this respect.
Paul Ferrill, based in Chelsea, Alabama, has been writing about computers and software for almost 20 years. He has programmed in more languages than he cares to count, but now leans toward Visual Basic and C#.


Paul Ferrill has been writing in the computer trade press for over 25 years. He got his start writing networking reviews for PC Magazine on products like LANtastic and early versions of Novell Netware. He's been using and writing about Unix / Linux since before there was a Linux. Print publication credits include Datamation, Federal Computer Week, Information Week, InfoWorld, Network Computing, Network World, PC Magazine, and PC Computing. He's written for multiple web sites including IBM's Developerworks site. He recently had his first book published by Apress entitled "Pro Android Python with SL4A". Paul holds both BSEE and MSEE degrees and has written software for more computer platforms and architectures than he can remember.
Property of TechnologyAdvice. © 2026 TechnologyAdvice. All Rights Reserved
Advertiser Disclosure: Some of the products that appear on this site are from companies from which TechnologyAdvice receives compensation. This compensation may impact how and where products appear on this site including, for example, the order in which they appear. TechnologyAdvice does not include all companies or all types of products available in the marketplace.