 |
This article explains the advantages of tool WinInstall LE (a tool from Veritas software, which ships with Windows Server CD) and how to use this tool to convert EXE applications to MSI packages.
About Active Directory and Group Policy
WinInstall LE is certainly not the only approach to deploying an application-specific setting to multiple computers, but it is one that saves both time and money. Learn its advantages as well as how to use this tool to convert EXE applications to MSI packages.
You have, no doubt, heard about Active Directory. Active Directory is Microsoft’s answer to Novell Directory Service. Active Directory is a big repository of objects. It contains objects such as users, groups, shared printer information and network objects. Active Directory was first introduced in Windows 2000.
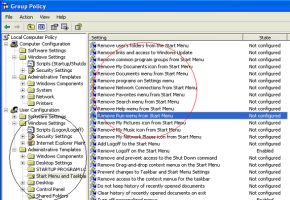
There is a tool or snap-in called Group Policy. Group Policy is meant for administrators who want to have a better control over systems running in network. Group Policy is used to control the behavior of desktop computers and member servers from a central location. There are couple of settings you can deploy using Group Policy on remote computers. Group Policy comes with pre-defined administrative templates. Administrative Templates are the configuration unit as shown in Figure 1. You use them to control the behavior of a specific setting, such as Start Menu and Taskbar, Internet Explorer Options settings, Registry Keys, Services and so on.
For example, you would consider hiding the “Run” dialog box on multiple computers running Windows XP on your network. The same way you would want to disable some services on Member servers running Windows Server 2000 or 2003. All of these settings you can control using Group Policy in Active Directory. Figure 1 shows the Group Policy and its Administrative Templates:
 |
| Figure 1: Group Policy snap-in showing Administrative Templates |
You can see in Figure 1, the left pane (dark circle) has Administrative Templates (called the Administrative Nodes sometimes) and right pane (red circle) contains the configuration settings under that node (i.e., Administrative TemplatesStart Menu and Taskbar). Microsoft ships pre-defined Administrative Templates with Windows, but it doesn’t really highlight the easiest way to design your own Administrative Template. You must have knowledge about how to create custom ADM files. These files or ADM files are imported in Administrative Templates.
Note that Group Policy is part of Active Directory installation. You promote a member server or a stand-alone computer to Active Directory Server or domain controller using dcpromo.exe. You don’t need to install it separately from Add/Remove Programs.
Okay. Let’s not get into much detail about Group Policy and Active Directory here. You can always check out the links mentioned below to learn more.
More information on Active Directory is avaiable at http://www.microsoft.com/windowsserver2003/technologies/directory/activedirectory/default.mspx. For more information on Group Policy check out, http://technet.microsoft.com/en-us/windowsserver/grouppolicy/default.aspx .
The other side of Group Policy is that it doesn’t come with all the settings. For example, what if I want to change Power Options settings on multiple computers? What if I need to install an EXE application on multiple computers? What if I need to change a specific setting (e.g., registry entry) on multiple computers in network and that setting is not pre-defined in Group Policy Administrative Templates? If I ever want to deploy or change settings on a remote computer for which Group Policy doesn’t have information, I would be out of luck.
In that case, you don’t have any option other than to buy third-party tools or create your own custom template (we will not discuss about creating custom template in this article) and also get your management to approve the cost of the tools. I’m sure before you go to management and ask them to approve the cost, you will always try to find alternatives.
Microsoft ships Windows Server CD with valuable tools. If you’re not sure what I’m talking about, VALUEADDED sub-folder in third-party MGMT folder. This folder contains a utility (or I would rather say, Tool) developed by Veritas Corp. This is WinInstall LE.
WinInstall LE
The main purpose of WinInstall LE is to convert EXE files to MSI package so these MSI Packages can be deployed using Group Policy – Software Installation extension. Before I dig more into this, bear in mind that WinInstall LE is not limited to converting EXE to MSI. It also serves other purposes. You can use this tool to capture configuration settings during the installation of an application. For example, you will want to capture the Registry Settings and Files Copied when you install an application.
WinInstall LE works as a snapshot tool. It takes the system snapshot before you make any changes to the system. The changes or snapshot is then recorded in a MSI file. There are two types of snapshots in WinInstall LE: Before Snapshot and After Snapshot.
- Before Snapshot:Before Snapshot takes a snapshot of the system before you make any changes. In this step you are asked to run an application after it has finished taking the snapshot of the system. You can decide to run an application here or make any changes as per you need.
- After Snapshot: After Snapshot takes a snapshot of the system after you have made changes to the system. The changes could be made by an application or made by you manually (e.g., changing registry values). These changes are then saved in a MSI file.
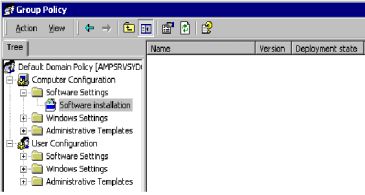
Note: Software Installation extension is part of group policy. You can see in Figure 2, the software installation, an extension to Software Settings is displayed. In the right pane you would see the software or MSI packages you are currently deploying using the Group Policy. As mentioned earlier, Group Policy – Software Installation extension doesn’t support installation of EXE applications. It supports only MSI files.
 |
| Group Policy Software Installation snap-in |
So, to summaries, you can use WinInstall LE tool to accomplish the below mentioned tasks:
- Convert EXE files to MSI package.
- Capture configuration settings during an application installation.
Now you have enough background information about WinInstall LE and Group Policy. It’s time to walk through some examples.
Let’s say you want to change Power Options configuration on more than 100 computers on your network. As a manual process, this will take considerable time. There is an alternative to this that requires you to purchase separate third-party tools, but we will be using WinInstall LE in our example to eliminate the need to purchase a third-party tool.
You can find information about third-party tools at http://www.microsoft.com/windowsserver2003/technologies/management/grouppolicy/gptools.mspx
Before I walk you through an example, I would like to state that WinInstall LE tool can be used in the following scenarios:
- You must deploy application updates on more than one computer. For example, you have an application installed in your environment and you want to update the application.
- You have an EXE Setup program that must be deployed on your network using Group Policy snap-in, but Group Policy doesn’t support EXE. It supports only MSI or other packages.
- You want to identify the changes an application made on a single computer (e.g., Registry Settings or files copied during the installation).
Learning by Example
The following example covers all the above mentioned scenarios.
As an example, suppose you have deployed an application on more than 100 computers in your network environment and a problem arises with that application. You report the problem to the application vendor and they supply a patch consisting of an EXE file and a few registry settings to update the application settings. You are now faced with the tedious task of deploying this fix on multiple computers.
Let me be clearer on the application settings here. The registry settings the vendor supplies include a .REG file that contains so many registry entries in it, and the vendor has asked you to import this .REG file to all computers running that application. This .REG will update the Application Settings. The EXE patch supplied by the vendor will update DLL files of the application.
So the steps the vendor supplies include:
- Log on to a computer where this application is running.
- Copy the .EXE and .REG files to C: drive.
- Double-click on EXE file.
- Wait for EXE to complete.
- Now double-click on .REG.
- Click on Yes to import the registry settings.
- Restart the computer for changes to take effect.
- Repeat from a-g on all computers running that application.
Using WinInstall LE you must follow the above-mentioned steps but only once! This is how you do it:
1. Install the WinInstall LE tool on a computer where this application is currently running. You must install WinInstall LE on only one computer.
2. Copy the EXE and REG file to a local folder. Let’s call it C:AppPatch.
Before Snapshot Steps:
3. Run the WinInstall LE. The first time you run the tool, it will ask you to run any application or make any changes you want to make to the system. You can either press Cancel here or select an application to install. You must select patch supplied by the vendor. Select the EXE file from C:AppPatch folder.
4. After the patch has run successfully, restart the computer. WinInstall LE does not require this, but you must restart your computer. In fact, some application settings take place only after you restart the computer, so it is always a good practice to do so.
After Snapshot Steps:
5. Run WinInstall LE again. It will ask you to run the “After Snapshot” as mentioned earlier. Don’t be tempted to skip this step as it is the one that will record all the changes made by the patch (EXE and REG files).
6. You will be prompted to save the changes made by the patch. Select a folder in which you want to save the changes as MSI file. This folder will contain one MSI file and other files inclusive of registry keys. I assume you have created a folder called C:MSIPatch and saved the MSI in this folder.
7. Verify that the application is working properly after installing the patch supplied by the vendor.
8. Copy C:MSIPatch to a network-shared folder.
9. Use Group Policy to deploy MSI file to multiple computers. The below article explains how to deploy the MSI file you recently created using WinInstall LE.
The article How to use Group Policy to Install Software Remotely in Windows Server 2003 explains how to create a distribution share for deploying/installing MSI file remotely.
One thing to notice in the above example is that there is no relationship with Group Policy and WinInstall LE. The Group Policy can work without WinInstall LE and vice-versa. The Group Policy and WinInstall LE, both the tools, serve a different purpose. WinsInstLE serves the purpose defined above (e.g., converting or creating EXE to MSI), whereas Group Policy deploys these MSI files from a central computer to multiple remote computers.
Summary
In this article, we discussed using WinInstall LE with Group Policy. WinInstall LE and Group Policy can both save time when it comes to deploying an application-specific setting to multiple computers. These settings include updating a registry key for an application. WinInstall LE is a snapshot tool that records the changes made by an application and saves all the changes in a MSI file.
Later, this MSI file can be deployed using Group Policy – Software Installation extension. Third0-party tools are also available to serve the same purpose, but this could be costly. WinInstall LE saves both time and money.
You can also use the MSI file created in a non-domain security model. In this model there will be no Active Directory or Group Policy. We will discuss this in our next article, where we will also talk about using WinInstall LE for different scenarios. We will cover creating Configuration SETs for Windows Component Services (such as DHCP, DNS, AD, WINS, RRAS, etc).

