


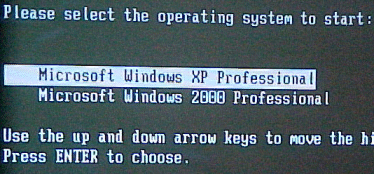
Upon restart, the computer
will either boot directly to Windows XP Professional or it will bring up the
operating system selection window (the text of the BOOT.INI file) if you
have more than one operating system installed.
After you start Windows XP
for the first time, you will come to the Welcome to Microsoft Windows screen
to finish setting up your computer. Click on the Green NEXT arrow at the
bottom right hand corner of the display.
The system will then check
to see how you will connect to the Internet. If Windows cannot detect the
settings it will prompt you for input. (You can also select SKIP to by pass
this section).
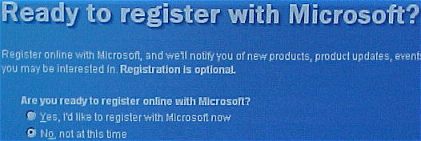
The Registration of your
Windows XP Professional software IS NOT REQUIRED. You can skip this step and
never go back to it.
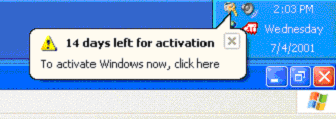
The Windows Product
Activation screen appears next. Windows Product Activation has been designed
by Microsoft to protect their intellectual property as much as possible from
software piracy. According to Microsoft through the setup feature, you do
not need to send any information at all when you activate the product, not
even a name. This step is required, at this time or within the first 30
days.

If you decide to skip this
registration step now, you will only be able to use Windows XP Professional
for 30 days. At that time, the operating system will not function without
activating the product. You will have no other option but to either blow the
partition away and reinstall the OS for another 30 days or activate the
software.
If you skip this step,
Windows XP will periodically remind us during our 30-day period to Activate
the product.
The next screen we are
brought to is the Internet Access screen, which allows us to configure our
Internet connection at this time as well. You do have the option to skip
this step as well.
The next screen that
appears is the User Setup screen. On this setup page you are able to enter
the name of each person that will have local access to this computer. If you
choose to do this now, Windows XP Professional would create a separate user
account for each name entered.
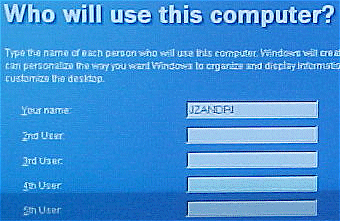
These names would first
appear on the Welcome Screen in alphabetical order. At that point, users
would be able to select their name from the Welcome screen to use the
computer. The local administrator can use User Accounts in the system
Control Panel to assign these users with passwords and system permission
limits. It is also where additional users can be created, in lieu of doing
here or in addition to entering some here.
At least one name needs to
be entered.
This first user becomes a
local administrator by default.
Well, that’s the soup to
nuts of an attended installation of Windows XP Professional.
In the next installment I
will briefly go over some of the other installation methods of Windows XP
Professional such as over the network installations, RIS installations, and
automating installations using Windows Setup Manager.
Until then, best of luck in
your studies and please feel free to contact me with any questions on my
column and remember,
“If a bad guy can alter the operating system on your computer, it may not be
your computer anymore”
Jason Zandri