Network Interface Card (NIC) teaming on Windows Server editions allows systems administrators and IT professionals to achieve higher network reliability for Windows-based systems. This article will guide you through what NIC teaming is, its various modes, and how to set it up on your own network.
What Is NIC Teaming?
NIC teaming allows you to combine multiple physical network adapters into a virtual NIC, which will then be presented to the operating system (OS) as a single NIC. All the incoming traffic from the OS will pass through the virtual NIC and be load-balanced across the assigned physical network connections.
NIC teaming on Windows Server can support up to 32 physical connections per virtual NIC. By deploying NIC teaming a single IP address is used.
This technology offers system administrators a simple solution for link aggregation, load balancing, failover, and Software-Defined Networking (SDN). There are similar solutions available on certain hardware from third-party vendors, but these are often limited to specific hardware. One of the benefits of Microsoft’s NIC teaming is that it is hardware and vendor-agnostic. NIC teaming is available in all editions of Windows Server since Windows Server 2012.
Benefits of NIC Teaming
The benefits of NIC Teaming stem from its load-balancing capabilities. Efficiently breaking up network traffic across multiple connections, NIC teaming better utilizes network resources, ensures server availability, and increases bandwidth. It also helps simplify network configuration.
NIC teaming increases the available bandwidth in a network path while providing redundancy to the system. Using NIC teaming, organizations can avoid single points of failure.
In specific scenarios, when one of the physical networks fails or is disconnected, the system automatically redistributes traffic to other network adapters. This is achieved by designating at least one of the NICs as a hot spare.
In short, the benefits of NIC teaming include:
- Increase of load-balancing capabilities.
- Breakup of network traffic across multiple connections.
- Strengthens failover, reducing single points of failure and creating redundancy when an NIC is designated as a hot spare.
- Increases network reliability and continuity.
- Ensures server availability and increases bandwidth.
- Simplifies network configurations.
Issues With NIC Teaming
NIC teaming has numerous benefits. However, it can also present a variety of problems if best practices are not followed.
Building redundancy into NIC teaming is essential to mitigate the consequences of a failed NIC. At least one NIC of the NIC team must be designated as a hot spare.
However, even if you designated a NIC as a hot spare, traffic still needs to be segregated to avoid potential chokeout of other types of traffic. IT teams should ensure that not all types of traffic flow through the NIC team. The network must have resources to manage a certain type of traffic, including client traffic (end-user access), cluster communication traffic, VM replication traffic, live migration traffic, storage traffic, and out-of-band management traffic.
Another best practice is to ensure cluster consistency. In a clustered environment, each of the cluster nodes should be equipped with an identically configured NIC team.
It’s also important to consider compatibility issues. Not all third-party hardware or software, such as switches, drivers, or firewalls, may work on NIC teaming.
Configuration is a key point to ensure optimal performance and reliability. NIC teaming requires careful configuration of its mode, load balancing algorithm, and VLAN settings to ensure its performance. Incorrect or inconsistent configuration can lead to network problems or failures.
Setting up NIC teams is not a one-and-done task. NIC teaming adds complexity to systems and networks, so the NIC team needs to be continually managed once configured. Administrators need to monitor the performance and make adjustments if necessary.
NIC Teaming Requirements for Virtual Machines
There are several NIC teaming requirements for virtual machines that must be considered firsthand. The most essential requirement is access to Windows Server 2012, 2012 R2, 2016, 2019, or 2022.
Note that in Windows Server 2016, you can use NIC teaming in Hyper-V, but in some cases, Virtual Machine Queues (VMQs) might not automatically enable the underlying network adapters when you create a NIC team. In that case, use the following Windows PowerShell command to ensure that VMQ is enabled on the NIC team member adapters:
Set-NetAdapterVmq -Name <NetworkAdapterName> -Enable
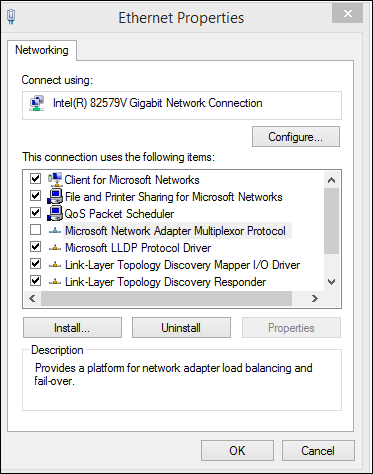
Another requirement is to activate the Microsoft Network Adapter Multiplexor Protocol. By default, this feature is disabled, as it is a kernel-mode driver that creates a special set of configurations necessary to run different connections. For more on the Microsoft Network Adapter Multiplexor Protocol, see the “FAQ” section at the end of this report.
To set up NIC teaming at least two NICs are required. Finally, while no advanced technical skills are required to set up NIC teaming, basic know-how and best practices must be considered. Please see “How to Set Up NIC Teaming” for more detailed instructions.
NIC Teaming Modes
When you set up NIC teaming, you must select what Teaming Mode to use. The Teaming Mode determines how the server and switch(es) allocate traffic between multiple connections. There are three types of teaming modes: Switch Independent, Link Aggregation Control Protocol (LACP), and Static.
Switch Independent Mode
If this mode is on, you can connect different network adapters to different switches. For example, if you had three NICs in a team, all NIC ports could be connected to a port on three different switches.
This is the only teaming mode that doesn’t require configuration changes on the connected switches. Switch Independent Mode uses media access control (MAC) addresses to manage incoming data.
LACP Mode
This mode requires enabling LACP on both the team and the switches. LACP mode provides load balancing and failover for both inbound and outbound traffic, and it supports dynamic changes in the team membership or switch configuration.
LACP can negotiate the optimal number of links in a team based on traffic demand and availability.
Static Mode
Static Mode requires you to manually configure the ports on the switch that connects with the NIC team. These ports should be configured into a Link Aggregation Group (LAG). The configuration must be the same on the host and switches to identify which links are from the NIC teaming mode.
In Static mode, the server and the switch split traffic between all links connected to another device. The downside is that it doesn’t help isolate errors, such as incorrectly connected cables. While this mode provides load balancing and failover for both inbound and outbound traffic, no dynamic changes in NIC team members or switch configuration can be made.
How to Set Up NIC Teaming on Windows Servers Editions
You can configure NIC Teaming on Windows Server 2012 or newer by following these simple steps.
- Open the Server Manager and click on Local Server.
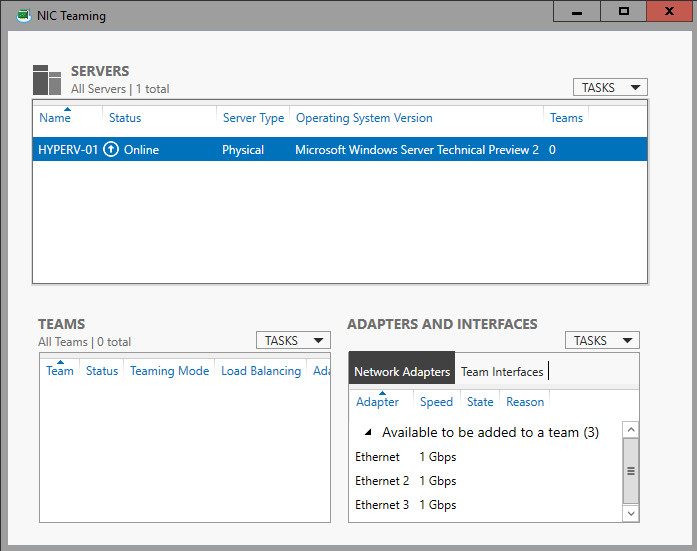
- NIC Teaming is disabled by default on Windows Server. To enable it, find the Properties pane, locate NIC Teaming, and then click Disabled to the right. The NIC Teaming dialog box will open.

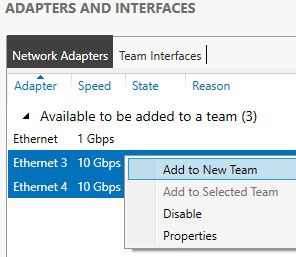
- In the bottom right, under Adapters and Interfaces, select the network adapters you want to add to an NIC Team.
- Now, Click TASKS and select Add to New Team from the drop-down menu.

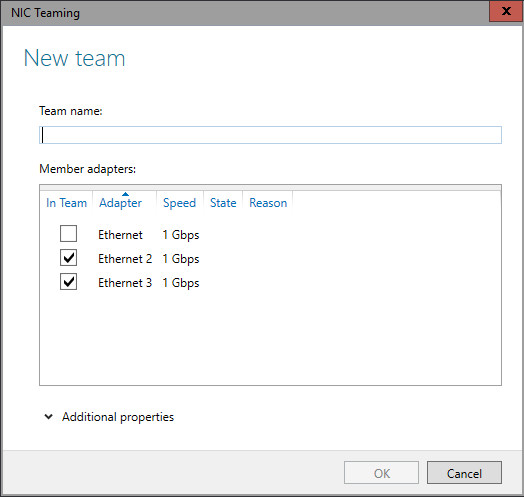
- The New Team box will open and display the network adapters and team members. Type in the Team name for your new NIC Team.

- At the bottom of the New Team box, click on Additional properties and select the NIC Teaming mode you want to use: Switch Independent, Static Mode, or LACP Mode. In this step, you can also select the load-balancing mode. Experts recommend it to be set to Dynamic for best performance.
- When you’re done, click OK. Your new NIC Team will be created.
You can configure or assign a VLAN number to the new NIC Team you created. To do this, click the link to the right of the Primary team interface. The New team interface dialog box will open. Now click on Specific VLAN and type the VLAN data.
How to Set Up NIC Teaming Using PowerShell
NIC Teaming can also be set up using PowerShell.
To do this, follow these steps:
- Type
PowerShellon the Windows search bar in the bottom left of your screen and hit Enter. - The PowerShell window will appear. Type in the command
Get-NetAdapterto list all the available network adapters on your system and choose which you want to team. - Now enter the command
new-NetLBFOTeam [TEAM NAME] “[NIC1]”, “[NIC2]”and press the Enter Key.- [TEAM NAME] is the name of your new team of NICs.
- [NIC1] is the name of the first network adapter you identified and chose to use.
- [NIC2] is the name of the second network adapter you identified and chose to use.
- You can add more network adapters if you want.
- Verify that the team is created and operational. Use the
Get-NetLbfoTeamcmdlet to view the details of the team or theGet-NetAdaptercmdlet to see team members. - Finally, to check the team’s status, run the command
Get-NetLbfoTeam -Name Team1Get-NetAdapter -Name Team1
You should see the status for the team and team members set as Up/Active or Up/Standby.
Note that there are several variables to the PowerShell command to create NIC teams. The parameter new-NetLBFOTeam has four possible values: TransportPorts, IPAddresses, MacAddresses, and HyperVPort. For example, if you want to create a team named Team1 with the Dynamic mode, you can run the following command:
New-NetLbfoTeam -Name Team1 -LoadBalancingAlgorithm Dynamic-TeamMembers Ethernet,Ethernet2
FAQs
What Is Microsoft Network Adapter Multiplexor?
The Microsoft Network Adapter Multiplexor is a kernel mode driver consisting of a protocol that helps simplify NIC Teaming by removing the need for third-party utilities. The Microsoft Network Adapter Multiplexor is designed to manage and coordinate the use of different connections grouped under one physical device to increase bandwidth or fault tolerance.
Should the Microsoft Network Adapter Multiplexor be Enabled?
Yes, if you are setting up NIC teaming, the Microsoft Network Adapter Multiplexor must be enabled. The adapter can be found in the Wi-Fi properties windows under the “items this connection uses” list. Remember that by default, the adapter is disabled.

However, Windows Server Editions are built to automatically enable the Multiplexor when an NIC team is created. While there is no need to enable the Multiplexor manually, check that it is active after creating your NIC team.
Which NIC Teaming Mode Should I Use?
There is no one-size-fits-all mode when it comes to choosing which to use. Each mode is designed for specific cases.
The section above on NIC Teaming modes explores the different modes, such as Switch Independent mode, Switch Dependent mode, and Static or Dynamic mode. Each mode has its own advantages and disadvantages depending on the network topology, switch configuration, and traffic patterns.
You should ask yourself certain questions before selecting which to use. For example, will you want to make configuration changes on your connected switches, or will you use multiple non-stack switches for the team members? Depending on the configuration you plan to use, you should choose the corresponding mode.
The best NIC teaming mode for your environment depends on factors such as your network topology, switch capabilities, traffic patterns, and availability needs. You should also consult your switch vendor’s documentation and test different modes before deployment. Go to the section “NIC Teaming Modes” in this report for details on each mode.
Bottom Line: Using NIC Teaming on Your Network
NIC teaming is a feature that allows multiple network adapters to work together as a single logical interface. NIC teaming can improve network performance, reliability, and availability by providing load balancing, failover, and fault tolerance capabilities. However, NIC teaming also has some challenges, such as compatibility issues, configuration complexity, and security risks.
Having a clear understanding of NIC teaming and how to use it effectively in your network environment is essential. NIC teaming is a powerful feature that can enhance your network performance, but it also requires careful planning and maintenance. Follow this report’s best practices and guidelines and leverage NIC teaming to optimize your network infrastructure and achieve your goals.
Featured Partners: IT Software
NinjaOne
NinjaOne is the leading unified IT operations platform, providing a seamless, single-pane solution to manage endpoints and support end-users. Ninja reduces complexity, drives technician efficiency and gives IT teams full control over managed IT assets. The platform gives IT teams proactive monitoring, remote management, remote control, patch management, software management, backup, and more - all in one unified solution with a fast, modern, intuitive interface.
Zoho Sprints
The current fast-paced software industry has reached where it has with a major chunk of credit to agile concepts. Zoho Sprints is an all-encompassing agile project management tool that lets you deliver successful IT projects. In addition to the fundamentals, Sprints also comes with thoughtful features like a dedicated CI/CD pipeline and seamless integration with Github, Jenkins, Azure Devops and more. Commit yourself to excellent delivery, get Zoho Sprints today!
NordLayer
The importance of cybersecurity rises with the growing numbers of cyber-attacks and malicious activities businesses face every second. Securing the data and constantly mitigating external threats like malware, phishing, or unfiltered websites is a challenge easier to overcome with advanced solutions. NordLayer is designed and developed with Secure Access Service Edge (SASE) architecture and Zero Trust model in mind to adhere to the most comprehensive and contemporary security landscape.


