Apple uses NetInfo to store configuration information in a database. NetInfo isn’t a new idea; it’s actually LDAP under the covers. This is good news for Unix friendly people: you can tweak anything you like. What can be changed? Does the NetInfo Manager hold the key to your overall happiness? We think so, and we’d like to share a few tidbits of NetInfo hackery with you.
From adding remote mounts to getting root, OS X’s NetInfo Manager is a handy tool.
Apple would prefer to call it a directory server, but we all know what is really happening here. Windows Active Directory is the same. You can query the Directory Server with any old LDAP client and see how the “hidden” things are actually stored. Administrators with a highly Apple-centric network are probably running OS X Server and administering NetInfo already. With the popularity of OS X clients steadily rising, other network and Unix administrators should probably know how to configure certain things in OS X too.
Got Root?
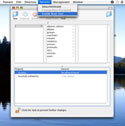
The first interaction with NetInfo Manager that any Unix-savvy person has is normally the task of enabling the root account. There are certain functions within OS X that require root access if you choose to use the command line tools. If you’re administering someone’s OS X client, or even just helping configure a few things, you’ll probably want to enable root access to avoid trekking to the computer every time something needs to change. Enabling the root account is simple: launch the NetInfo manager (Applications->utilities->NetInfo Manager), click on the “lock” to authenticate and enable changes, click the security menu, and choose “enable root user.” You will be prompted to create a root password, as you’d expect.
With the root account enabled, you can now ‘su’ to root and do as much damage as you can bear. Common tasks include mounting NFS file systems, running ifconfig, and killing processes. Enjoy your shell.
 |
Enabling the root user in NetInfo Manager (Click for a larger image) |
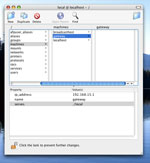
An LDAP or Directory server stores information and configuration files, as we already mentioned. Furthermore, it is possible to store tons of host-specific information, normally found within /etc, inside the directory server. This is Apple’s approach. Anything that you’d normally edit files for on a standalone Linux installation can be tweaked via the NetInfo manager. For example, many people still like using the /etc/hosts file instead of configuring DNS for a small outfit. This, of course, is stored in NetInfo, but referred to as “machines” instead. The existing NetInfo entry for localhost (127.0.0.1) provides a sufficient example. Mail aliases are stored here as well, though it probably isn’t very useful since OS X doesn’t send reports and system alerts via mail.
Remote Filesystem Mounts are a Snap
The truly wonderful part of the NetInfo database is that you can use it to automatically mount remote file systems at login time. This is the equivalent of adding a remote file system to /etc/fstab in Linux. Any type of file system that can be mounted with the Finder can be configured to automatically mount at boot time, including SMB, NFS or AFS shares.
In the NetInfo Manager, click on mounts, then the + (New icon) to add a new entry. To mount an NFS share you’ll need to add three fields to the new entry:
- vfstype: “nfs”
- dir: “/local/directory/to/mount/on”
- name: “server:/shared/directory”
They are called “properties” and “values” in NetInfo Manager. In the first line above, the “vfstype” is a property, and “nfs” is its value. This is all that’s required to mount an nfs share at boot time. To troubleshoot mounting issues, you can use the “mount_nfs” command with your shiny new root account and manually mount the file systems, observing any errors that occur. The same logic above applies to AFS and other types of shares, and the exact syntax can be found in Apple’s “Understanding and Using NetInfo” handbook (PDF, 1.9MB).
The previous example of mounting a file system will mount all specified file systems statically, meaning the operating system is going to expect that they’re always present. This isn’t desirable, especially in situations where you’re using a laptop and wish to move around. If a mount disappears, unpredictable hanging and slowness can occur while the operating system tries to decide if the network is slow or missing. A much better method of mounting remote file systems is to create automounter entries in the NetInfo database.
 |
Creating a machine entry in NetInfo Manager (Click for a larger image) |
When using dynamic mounts, the automounter doesn’t mount a remote directory until you try to access it, making it possible to have thousands of entries present. In large networks, this is precisely how things operate. Every client connects to a master NetInfo database, which contains all the automount maps. For example, if you want home directories to live in /home, the NetInfo database contain information for all the users and their home directory mount points. If a program tries to access /home/joe, the automounter will quickly mount the directory from whatever server:/path/ is specified in the NetInfo database. The automounter might be overkill for small sites and home users, but in an enterprise environment it is a lifesaver. Maintaining thousands of NFS mount points will slow down the fastest of computers.
There is one slight caveat to deal with if you want to store your home directory on another server. OS X expects your home directory to live in /Users, but this is easily changable. If you want to store your home directory on a file server (or multiple servers, depending on your current location), you can simply edit NetInfo to effectively say “joe’s home directory is in /home/joe.” You don’t even need to use the automounter to do this, simply click on users, choose your username, and change the “home” property to specify any remote or local directory.
The NetInfo Manager was intended for larger, centrally managed networks. There are, however, certain changes that you can make that will increase daily productivity. Think about how many times you’ve mounted a Windows share or NFS share by hitting command-K in Finder. It’s certainly quicker to just navigate to a directory where the remote file system is already mounted.
Experiment and have fun: You’re using Unix, after all!
This article was originally published on Enterprise Networking Planet.

