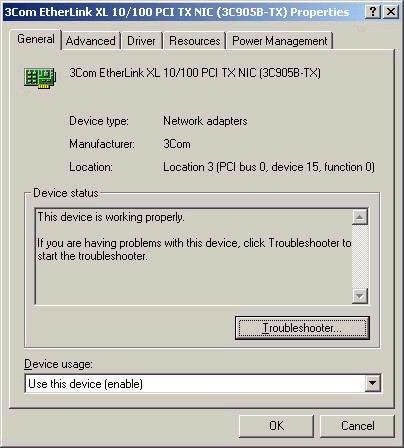
By right clicking on a device and choosing its properties, we can configure additional setting for that particular device (though what settings can be changed depends on the device) such as driver or resource settings. The setting for a network card are shown below as an example:

You should be aware of the
purpose of each tab. The General tab provides device status information,
access to the associated troubleshooter, and whether the device is
enabled or disabled. The Advanced tab allows you to configure any
advanced properties for a device, and will vary based on the type of
device (for example, enabling Duplex Mode on a NIC). The driver tab
provides driver details, as well as the ability to uninstall or update a
driver (choosing upgrade driver will launch the driver update wizard).
The Resources tab is where settings such as IRQ and DMA settings are
maintained. Finally, the Power Management tab controls whether the
device can bring the computer out of standby, as well as whether the
device can be power managed by the OS.
There
are a few icons that you may see in Device Manager, as outlined below:
| Black Exclamation Point on yellow background | Device is in a problem state (may still be functioning – see error code) |
| Red ‘X’ over device | Device is disabled |
| Blue ‘i’ on white background | Means that ‘Use automatic settings’ is not selected for a device, and that resources were manually selected |
| Question Mark | Resources for the device are not assigned |
Additional details you should know about Device Manager:
– There now exists an option called Scan for Hardware Changes, which allows you to scan for changes in the state of a device. For example, if you had an external modem that was powered off when booting, you could turn it on and then choose this option.
– There is also an option in Device Manager called Show Hidden Devices. This will show legacy devices and devices no longer installed.
– Buried in the LPT properties Port Settings tab in Device Manager is a check box called
Enable legacy plug and play detection. This allows older parallel port plug and play devices (such as zip drives or scanners) to be detected.
– Do not confuse Device Manager (a tool with which you can make changes) with the System Information Tool. The System Information tool is simply the replacement for NT Diagnostics, and is strictly read-only in terms of functionality. In NT,
Winmsd.exe opened NT Diagnostics, now it opens the System Information Tool.
Multiple Display Support
Another new feature in Windows 2000 is the ability to support multiple monitors. Windows 2000 can support up to 10, and allows you to extend the desktop across these additional monitors. Of course, you will need a number of separate display adapters for this to work (or an adapter that supports dual monitors). One adapter must function as the primary display device, the others as secondaries. Color depth and resolution can be configured for each device individually, via the Display program. A few important notes on multiple monitors:
– PCI or AGP display adapters are the only types supported for multiple monitors in Windows 2000
– If you have an on-board display adapter, this will automatically be made a secondary. You should always install Windows 2000 with the onboard adapter only. If another adapter is present, Windows 2000 will disable the onboard adapter during setup. Add additional display adapters after the OS is installed. If your setup now has an onboard and a PCI adapter, for example, the PCI will be the primary, the onboard the secondary. Note that your BIOS may not support using the onboard adapter when another physical adapter is present.
– You can drag the monitor icons in the Display program to match the physical layout of your monitors.
– If multiple monitors is not working correctly, be sure that the
‘Extend My Windows Desktop Onto This Monitor’ checkbox is selected for any secondaries, and that you are using a display adapter capable of supporting multiple monitors
(PCI or AGP)

