


Introduction
Introduction
Apache is the worlds most popular web server software. That is according to the fine people at Netcraft. In their survey for February 2001, which polled 28,125,284 sites, Apache was found to be serving almost a full 60% of them. Microsofts family of IIS based servers (includes Personal Web Server) is next, nearing the 20% mark. Obviously these numbers will change. For the most up to date info please visit http://www.netcraft.com/survey/
Apache is the world’s most popular web server software. That is according to the fine people at Netcraft. In their survey for February 2001, which polled 28,125,284 sites, Apache was found to be serving almost a full 60% of them. Microsoft’s family of IIS based servers (includes Personal Web Server) is next, nearing the 20% mark. Obviously these numbers will change. For the most up to date info please visit http://www.netcraft.com/survey/
A clear trend is visible when looking through the charts of previous surveys. Apache is grabbing up marketshare. It is the dominant web server and, at its current rate, will continue to outpace all comers. I find this intriguing considering the way that Apache is developed.
Before I go any further please know that I am a fence sitter when it comes to the whole open source software debate. Both sides have good arguments for the way they do things. I do like Apache better than IIS. Right at the moment I’m not sure why. I could make up a lot of reasons, they might even be plausible. All I know is that I have more experience with IIS, I used it long before I touched any other webserver product but I would rather use and recommend Apache.
Now where were we? Right the development of Apache is handled strangely enough by an organization called the Apache Group http://www.apache.org/. There is a core of developers that call the shots but anyone is allowed to suggest changes to the code. The group feels that in this manner their webserver will grow in the best direction to serve the people who use it. According to the Netcraft surveys, they must be doing something right.
Apache on Windows?
Yes it is possible. Should you do it instead of IIS? That’s your choice. The Apache Group says it is experimental, so I think we should experiment with it. They do note that it is not as fast as when run on a Unix or Linux system. Actually at the moment they ask that comparisons use Apache on *nix systems as the base. Nonetheless there are many people using Apache on Windows to meet their day to day needs, maybe we can too.
The lab box that I am using when writing this is an older Intel based machine. It has a Celeron 333 processor, 128MB of RAM and about 15 GB of hard disk space. Nothing fancy, however we should get decent performance from it. Also I did a fresh install of Windows 2000 as a standalone server then removed any sign of IIS.
Well we have a box and an OS, now we have to get Apache. There are mirrors everywhere but as usual the best place to look is of course at the source. The Apache Group’s web site has links to all the downloads. The ones we are looking for are apache_1_3.19-win32-with_src.msi or
apache_1_3.19-win32-no_src.msi
as the names suggest the former contains the source code and latter does not.
These are both precompiled binaries that can be run just like any other Windows program. Although on a Windows 95/98/NT4 machine you may have to download and install the Windows Installer Program version 1.1 or higher. Check these links:
ftp://ftp.microsoft.com/developr/platformsdk/oct2000/msi/winnt/x86/instmsi.exe
ftp://ftp.microsoft.com/developr/platformsdk/oct2000/msi/win95/instmsi.exe
As a note there is also a download available for version 2.0a9, however it is an Alpha version and I figure we’ll have our hands full enough with version 1.3.19. Go get the binary, fire up your test box, come back and we’ll see what kind of trouble we can get into.
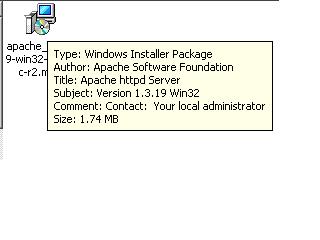
To start double click on the MSI file as shown
This will begin the Apache Httpd Server Installation Wizard. Just click next on this screen. Next comes the license agreement, nothing really exciting here, though it is different then most commercial licenses. Click Next.
The third screen in is a readme, read it then click next.
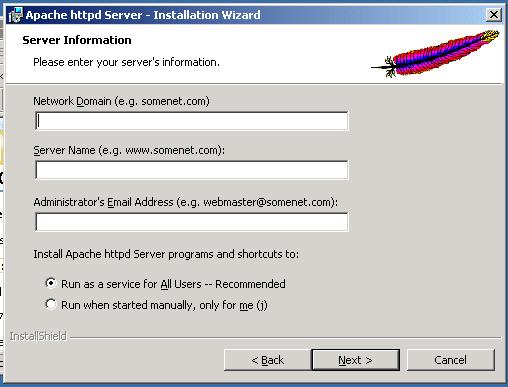
Now we get to fill something in. The Network Info screen shown below prompts for three items:
- The network domain, something like “thisisagreatarticle.com” without the quotes of course.
- The server name of the box you are installing on, www.thisisagreatarticle.com
- The email address of an administrative contact.
Also there are two radio buttons for choosing how to install Apache. The default is as a service. You shouldn’t have any problem leaving the default. If you would like to test everything before hand, you can choose Start Manually. After working out any issues you can set it to start as a service. When done on this screen choose next to continue.
The 5th screen to appear gives you the choice to do a complete or custom install. If this is the first time you have installed Apache do a complete. The custom install gives you the option to leave the documentation out. Click next to continue.
The next choice is where to put everything. It defaults to c:Program FilesApache Group
I left the default and it will be the directory I reference for the whole series of articles on this subject. Feel free to choose what you like or need as a path using the change button, just remember where it is. When finished click next.
Last chance to back out. This screen gives you back, install and cancel buttons. When you click on install it will begin copying files. On our test system it took about 15 seconds to finish and display the Installation Completed window. Click Finish.
To double check the installation go to the services applet in control panel. You should see Apache listed as a service. It will be set to automatically start and already going. Then check the installation directory you chose. It will look like this:
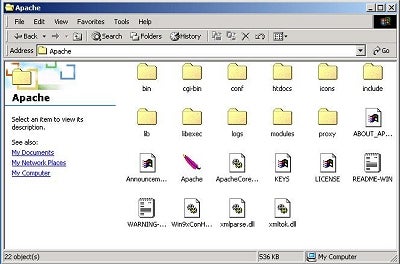
Htdocs is where the webpages are kept, and the conf directory is where we will be doing all our configurations in future articles.
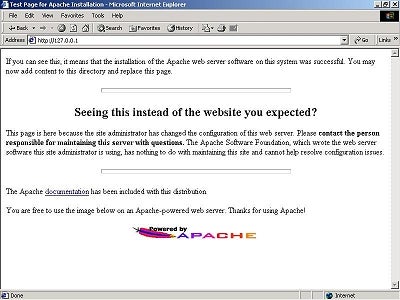
Finally open your web browser of choice and put 127.0.0.1 or the IP of your server. You should get the following screen, if you do, you are ready, just change the files inside the htdocs folder to your content.
Conclusion
This took less than five minutes to set up. Now there are plenty of configurations we can tinker with but we have a functional website up and running. In future articles we’ll look at running multiple sites under one Apache server, password protecting files, SSL, and using Apache as a proxy. See you next time.