If you are in the process of deploying virtual machines for development purposes and find yourself needing to repeatedly reinstall the operating systems inside the virtual machines, you will be required to attach the ISO file and then perform the operating system installation for each instance.
While you can attach the ISO file to a virtual machine manually using Hyper-V Manager,  it might take an inordinate amount of time if you need to attach the ISO file to several virtual machines. And if you need to repeat the same task every month, creating a tiny PowerShell script would help and could save you a lot of time.
Let’s take a closer look at how to use PowerShell cmdlets to attach and unattach an ISO file to virtual machines in bulk.
We can use the Set-VMDVDDrive PowerShell command to attach an ISO file to a virtual machine and use Remove-VMDVDDrive to unattach the ISO file from a single or all virtual machines.
If the requirement is to attach the same ISO file to all virtual machines on a local Hyper-V server, you’ll want to run the following PowerShell command:
Get-VM * | Get-VMDVDDrive | Set-VMDVDDrive -Path "E:OSISOWindows10.ISO"
Attaching an ISO File to a Remote Hyper-V Server
While the above PowerShell command collects all the virtual machines on the local Hyper-V server and attaches the “E:OSISOWindows10.ISO” file to all the virtual machines, the PowerShell command below attaches the same ISO file on a remote Hyper-V server:
Get-VM * -ComputerName HyperVHost1 | Get-VMDVDDrive | Set-VMDVDDrive -Path "E:OSISOWindows10.ISO"
While you can use the above PowerShell commands to attach the “same” ISO file to virtual machines, if you need to attach a different ISO file for each virtual machine, you will need to specify ISO mapping in a CSV file and then have the CSV file processed via the folowing PowerShell script:
$ISOMappingFile = "C:TempISOPerVM.CSV"$ThisCSV = Import-CSV $ISOMappingFileForeach ($AllItems in $ThisCSV){$ThisVM = $AllItems.VMName$VMISOFile = $AllItems.VMISOFileGet-VM -VMName $ThisVM | Get-VMDVDDrive | Set-VMDVDDrive -Path "$VMISOFile"}
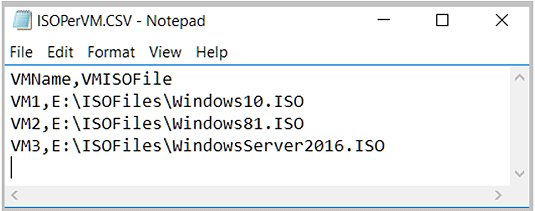
The PowerShell script above queries the ISO file to be attached to each virtual machine in “C:TempISOPerVM.CSV” file and then executes the Set-VMDVDDrive PowerShell command to attach the ISO file. The “C:TempISOPerVM.CSV” file appears as shown in the Figure 1.0 below.

Figure 1.0 – Maintaining ISO File Location per Virtual Machine
Removing ISO files from virtual machines can easily be done using the above PowerShell script, but you’ll need to replace the “Get-VM -VMName $ThisVM | Get-VMDVDDrive | Set-VMDVDDrive -Path “$VMISOFile” command line with “Get-VM -VMName $ThisVM | Get-VMDVDDrive -VMName $ThisVM -ControllerNumber 0 | Remove-VMDVDDrive” as shown in the script below:
$ISOMappingFile = "C:TempISOPerVM.CSV"$ThisCSV = Import-CSV $ISOMappingFileForeach ($AllItems in $ThisCSV){$ThisVM = $AllItems.VMName$VMISOFile = $AllItems.VMISOFileGet-VM -VMName $ThisVM | Get-VMDVDDrive -VMName $ThisVM -ControllerNumber 0 | Remove-VMDVDDrive}
In additon to using the Get-VMDVDDrive commands explained above, you can also use the PowerShell commands below to check if a ISO file is attached to virtual machines on remote Hyper-V hosts. By executing the following PowerShell command, you will query the virtual machine DVD drive path on multiple Hyper-V hosts:
Get-VM -ComputerName HyperVHost1, HyperVHost2, HyperVHost3 | Get-VMDVDDrive | Select VMName, Path | Export-CSV C:TempReport.CSV -NoTypeInfo
Removing ISO Files from Multiple Hyper-V Hosts
While you can use the above PowerShell script to remove ISO files from the virtual machines on a local Hyper-V Server, when you need to remove ISO files from multiple Hyper-V hosts, you can use the following PowerShell command to set the virtual machine DVD drive path to $null. For example, if you would like to set the DVD drive path to $null for all virtual machines on local Hyper-V host, execute this PowerShell command:
Get-VM | Get-VMDVDDrive | Set-VMDVDDrive -Path $Null
And if you would like to set the DVD path to $null for all virtual machines on remote Hyper-V hosts, execute this PowerShell command:
Get-VM -ComputerName HyperVHost1, HyperVHost2, HyperVHost3 | Get-VMDVDDrive | Set-VMDVDDrive -Path $Null
In summary, this server tutorial has revealed how to attach and unattach DVD drives to virtual machines in bulk. We also illustrated how to use simple PowerShell commands and scripts to perform the addition or removal of DVD drives to virtual machines in bulk.
Nirmal Sharma is a MCSEx3, MCITP and Microsoft MVP in Directory Services. He specializes in directory services, Microsoft Azure, Failover clusters, Hyper-V, System Center and Exchange Servers, and has been involved with Microsoft technologies since 1994. In his spare time, he likes to help others and share some of his knowledge by writing tips and articles on various sites and contributing to Health Packs for ADHealthProf.ITDynamicPacks.Net solutions. Nirmal can be reached at [email protected].

