Many organizations are implementing virtualization technology into their networks to convert physical computers to virtual machines (VM). This helps reduce overall physical hardware costs, conserve IT resources and improve flexibility and efficiency. Unfortunately, enterprise-level products used for virtual conversions are typically expensive. For organizations with a limited budget, Disk2vhd is a free option with many of the core capabilities of paid alternatives.
How to Convert a Physical Computer to a Virtual Machine with Disk2vhd
 The Disk2vhd tool can be run in two different modes, depending on if you want simplicity or customization: either GUI mode or command-line mode respectively. In this tutorial, we’ll cover how to convert a physical computer to a virtual machine with Disk2vhd using both methods.
Using Disk2vhd in GUI Mode
The Disk2VHD.exe tool can be downloaded directly from Microsoft here.
Before you start the conversion process using the Disk2VHD tool, it is important to shut down all the applications you are running on the physical computer.
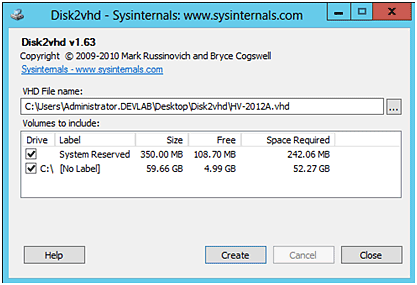
Step 1: When you double click on the Disk2VHD.exe, it scans the current computer for all physical drives and shows the available drives for your selection to proceed with the conversion. This is shown in the below screenshot:

Note: The Disk2VHD tool omits network drives attached to the physical computer, as these are not considered for the conversion.
The screen also shows you the free disk space required on the destination location where the VHD file will be created for the drives you have selected.
Note: System Reserved partition (unlettered volume), as shown in the above screenshot, is a bootable partition on the physical computer. Include this partition only if you want to make your VHD bootable. In other words, you may consider including the System Reserved partition if your virtual machine is going to boot from this VHD file.
Step 2: In the same screen, specify the VHD file name and location in the “VHD File Name” text box and then click on the “Create” button to start the conversion process.
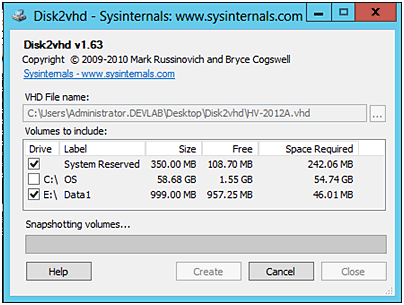
Step 3: When you hit the “Create” button, the tool will interact with the Operating System VSS component to create snapshots of the volumes as indicated in the below screenshot:

After the “snapshotting volumes” process is over, the data from the snapshot will be copied to the VHD file.
Using Disk2vhd in Command-Line Mode
Disk2VHD.exe can also be operated from the command line. For example, the following Disk2VHD command can be used to convert a volume to a VHD file:
Disk2VHD.exe
So to convert your C: drive to a VHD file, use the following command:
Disk2VHD.exe C: C:MyVHDsVM1.VHD
Tip: You can specify “*” in place of C: in the above command so that the Disk2VHD tool captures all the drives for conversion.
Tip: By default, when you run the Disk2VHD.exe tool for the first time on a physical computer, you will be prompted to accept the EULA. You can use the “-accepteula” switch to avoid the default behavior as shown in the below command:
Disk2VHD.exe C: C:MyVHDsVM1.VHD -accepteula
Note: All volumes you select will be packed into one VHD file unless you are using the command-line option to specify the VHD file name for each drive letter.
Why You Should Use Disk2vhd
One of the main reasons why you should use Disk2vhd to convert physical computers to VMs over other alternatives is the price tag – it’s free. It’s also a good option for Windows systems as it was built by Microsoft. Deployment is simple as Disk2vhd is just downloaded and installed via an EXE file.
Disk2VHD converts logical volumes to VHD files. VHD files can then be used either to create a VM on Hyper-V or attach VHD files as a second drive to the existing VM.
The conversion process copies all data from the logical volumes to VHD files. The Disk2VHD tool also copies the system-specific data such as the computer name, IP Address, MAC Address, Security Identifiers (SIDs), disk signature, etc.
How to Use VHD files
You can attach or use VHD files via one of the following:
- You can create a new virtual machine by selecting a converted VHD file as the virtual disk for the new virtual machine.
- You can attach a converted VHD on the 2nd IDE controller to one of the existing virtual machines.
- You can also browse the contents of a VHD file on the physical computer by attaching/mounting the VHD file using a computer management snap-in or the DiskPart.exe utility.
Tips for Converting with Disk2vhd
Here are some helpful tips to ensure that your conversion with Disk2vhd goes smoothly:
- Pay attention when using a converted VHD on a network (especially the operating system VHD file). You might see name conflict error messages if the physical computer is still connected to the network and you are using VHD in one of the virtual machines on Hyper-V.
- Disk2VHD.exe uses Volume Shadow Copy Service (VSS) to perform the conversion. This is achievable only if the VSS service on the physical operating system is running.
- There is no downtime while the conversion is in progress.
- Only physical drives attached to the computer are considered for the conversion. Network drives are ignored.
- Disk2VHD.exe can be used to make a VHD bootable if you have selected the “System Reserved (unlettered volume)” partition before starting the conversion.
- VHD files generated from the Disk2VHD.exe can be used with Hyper-V to create a new virtual machine or the VHD can be attached to an existing virtual machine.
- Since the Disk2VHD tool uses Volume Shadow Copy Service (VSS) for the conversion process, you can specify the local path as the VHD file destination.
- Disk2VHD takes the VSS snapshot of the drives you have selected and then begins the conversion process. This means any new data you save while the conversion is in progress will not be included in the VHD file.
- The tool can be used for simple conversions and is not designed to be a full replacement for SCVMM as discussed above.
- The conversion process may take considerably longer based on two factors:
- The size of the physical disks/partitions you have selected.
- The destination location for storing the converted VHD file is the same as the source. Since Disk2VHD.exe performs I/O operations (“Read” I/O for reading data on the logical/source volume and “Write” I/O for writing to the VHD file on the same drive), it will be much slower. It is recommended to specify the VHD file path to a location other than the volumes you have selected.
- Since Windows’ “Operating System boot loader” (WinLoad.exe) identifies attached disks by something called a “disk signature,” never attach the VHD to the same computer, as the generated VHD will also have the same disk signature. This will cause the boot process to hang, or in some cases, WinLoad.exe might change the boot order.
- Disk2VHD.exe might not finish the conversion process if any of the applications running on the physical computer put a lock on the disks or files. Backup applications always do this, so it is highly recommended to shut down any backup applications for a smooth conversion.
Disk2vhd Alternatives
One of the most common alternatives to Disk2vhd for Windows systems is another tool made by Microsoft, System Center Virtual Machine Manager (SCVMM). It’s part of Microsoft’s System Center suite of VM management and reporting tools. SCVMM is designed for the management of large numbers of virtual servers. The latest release, System Center 2019 Virtual Machine manager, added features in the areas of Azure integration, computing, networking, security and storage.

