IaaS, or Infrastructure-as-a-Service, allows you to host virtual machines in Microsoft Azure. The IaaS offering provides the virtualization layer that runs hundreds of Hyper-V clusters in Microsoft data centers located around the world.
You can create a virtual machine (VM) by using any of the following methods and then have the Azure fabric controller set up the VM for you. To create a VM in Azure, you can use the Azure Portal by logging on to https://Manage.WindowsAzure.com, accessing the Azure Preview portal at https://portal.azure.com, or utilizing Azure PowerShell, System Center App Controller, Visual Studio or any of a number of third-party tools. 
While there are several ways to go about creating an Azure VM, what suits you best will likely depend on your role. For example, if you are a Cloud Engineer, you might want to use one of the Azure Portals. Similarly, if you are a PowerShell administrator, you would likely prefer using Azure PowerShell.
Using Microsoft Azure Portal: Azure Portal allows you to create a virtual machine in just a few minutes. Azure provides a gallery of OS images that are syspreped. To create an Azure VM using the Azure portal, log on to https://Manage.WindowsAzure.com, click New > Compute > Virtual Machine and then click “From Gallery” as shown in the screenshot below.

Next, you need to select the OS image from the gallery, provide virtual machine information such as the VM name, Azure Region and admin credentials, and then create the VM. While this is the easiest way to create an Azure virtual machine, not all people prefer creating VMs using Azure Portal. For example, if you are a scripting guy or a PowerShell administrator, you would probably prefer to create Azure VMs using PowerShell scripts.
Note: Microsoft has an improved version of the Azure Portal that you can access by logging onto https://portal.azure.com/.
Using Azure PowerShell: PowerShell cmdlets are available for almost all Microsoft products. There are also PowerShell cmdlets available to manage Azure resources. You can download and install Azure PowerShell using Microsoft Web Installer from this location: http://go.microsoft.com/fwlink/p/?LinkId=320376.
Once you have installed Azure PowerShell modules, connect to Azure subscription and then use New-AzureQuickVM or New-AzureVM PowerShell cmdlets from your computer to provision a VM in Azure. It is imperative to understand that since you will be required to provide a variety of details, including an Azure storage account to store VM files, an Azure region where the virtual machine will be created, a virtual name and size, and an OS image name, this is not always a simple and straight exercise. You’ll need to have the required details handy before starting to create an Azure VM using PowerShell.
Using Azure CLI: Azure CLI, or Azure Cross Platform Command Line tools, has cross-platform commands for working with Azure resources. Azure CLI offers much of the same functionality found in both Azure PowerShell and Azure portals, but can be used from Windows, Mac and Linux operating systems. Before you can use the Azure CLI to create an Azure VM, you must install Azure CLI by following the instructions available at https://github.com/azure/azure-xplat-cli.
Using System Center App Controller: SystemCenter App Controller allows you to manage VM instances running in Azure as well as create a new Azure VM if required. Before you can create an Azure VM via App Controller, you will be required to create and upload a management certificate to Azure. You can use Makecert.exe or IIS Manager to create a self-signed management certificate.
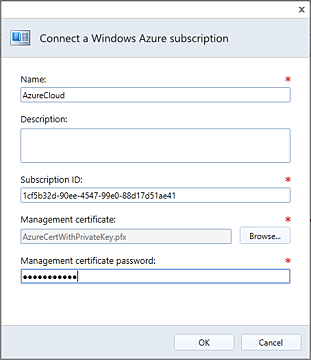
After uploading the certificate to Azure, use App Controller to connect to Azure by navigating to the Settings > subscription and then click on the Add button to display the “Connect a Windows Azure Subscription” window as shown in the screenshot below.

Once you have connected to Azure subscription, switch to “Virtual Machines” in the App Controller and click on the “Deploy” button to help you configure and deploy a VM in Azure.
Using Visual Studio: Apart from using Azure Portals, Azure PowerShell, Azure CLI and App Controller, you can also create an Azure VM by using Visual Studio. To create an Azure VM via Visual Studio, open “Server Explorer” in Visual Studio, click Azure node, right click on the “Virtual Machines” node and then on the context menu click on “Create Virtual Machine” to get started with the new virtual machine wizard.
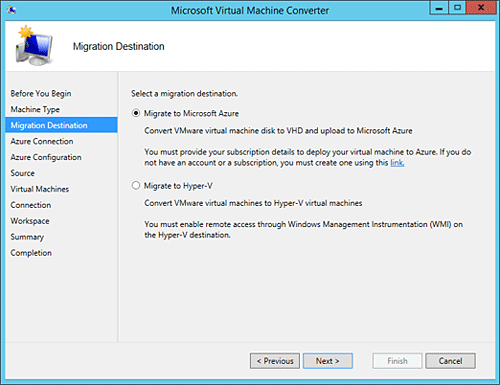
Converting and Uploading a VM using MVMC (Microsoft Virtual Machine Converter): As you might know, Microsoft deprecated P2V functionality in SCVMM 2012 SP1. Microsoft introduced its MVMC tool to perform virtual and physical conversions. Microsoft Virtual Machine Convertor is a new tool that is used to perform physical to virtual and virtual to virtual conversions. When converting VMware VMs, MVMC also provides an option to upload a converted VM to Microsoft Azure as shown in the screenshot below.

Although MVMC does not allow you to create a new VM in Azure, it does provide an opportunity to upload converted VMs to Microsoft Azure directly.
Nirmal Sharma is a MCSEx3, MCITP and Microsoft MVP in Directory Services. He has specialized in Microsoft Technologies since 1994 and has followed the progression of Microsoft Operating System and software. In his spare time, he likes to help others and share some of his knowledge by writing tips and articles on various sites and contributing to Solution IDs for www.Dynamic-SpotAction.com. Nirmal can be reached at [email protected].


