The debut of Hyper-V 3.0 running on Windows Server 2012 featured several useful new networking features for administrators. One of the new additions is the ability to configure NIC teaming for Virtual Machines.
NIC Teaming, originally designed for the Windows Server 2012 host operating system, can now also be used for Hyper-V virtual machines running on Hyper-V 2012 and later operating systems. In the earlier versions of Hyper-V (version 1.0 and version 2.0), it was not possible to configure NIC teaming for virtual machines. 
Starting with Hyper-V version 3.0 on Windows Server 2012, you can easily configure NIC Teaming for virtual machines. Before you can configure NIC Teaming for virtual machines, ensure the following requirements are in place:
- Hyper-V Host is running Windows Server 2012 or later. Since the NIC Teaming feature was introduced in Windows Server 2012, the host must be running this version of the operating system.
- Similarly, virtual machines must be running the Windows Server 2012 (or later) operating system.
- There are at least two or more virtual network adapters available in the virtual machine and they are connected to different external virtual Hyper-V switches.
- You must create external virtual switches on the Hyper-V host. Each virtual NIC that is going to be part of the teaming must be connected to these external virtual switches. If you do not do so, you will see a “Faulted: The Virtual Switch lacks external connectivity” error message when configuring the NIC teaming inside the virtual machine. This indicates that Virtual Machine Teaming is not supported if virtual network adapters are connected to either private or internal virtual switches.
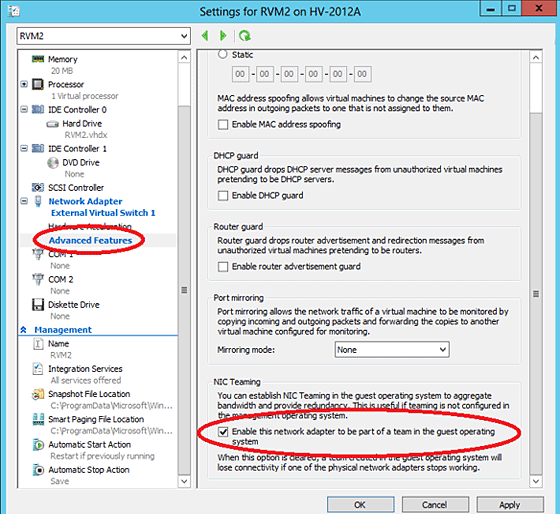
- Virtual network adapters must be configured to be available for the teaming. To do so, go to “Advanced Networking Settings” in the network configuration for the virtual machine and check “Enable this network adapter to be part of a team in the guest operating system” as shown in the screenshot below:
- By default, virtual machines are not configured to work with a teamed adapter. You must allow Virtual Machines to be configured with the NIC Teaming by executing the below PowerShell command:
Get-VM | Set-VMNetworkAdapter -AllowTeaming On
Once the “AllowTeaming” flag is set to ON for the virtual machine that is going to be used for the NIC Teaming, configure the NIC teaming in the virtual machine. It is as simple as configuring NIC Teaming on the Hyper-V Host. All you need to do is follow a simple set of steps of binding two or more virtual Network Adapters to a team:
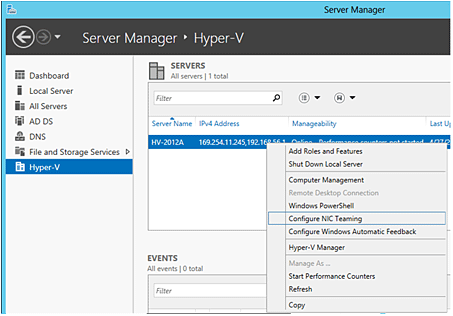
- Open Server Manager in the virtual machine, click on the Local Server in the left panel, and then click on “Configure NIC Teaming” as shown in the screenshot below:
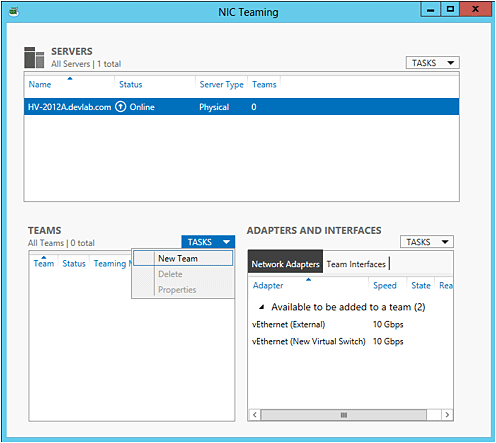
- In the NIC Teaming configuration page, click on “TASKS” and then click on “New Team” as shown in the below screenshot:
- In the “New Team” configuration page, specify the team name and select the network adapter that you want to include in the NIC Teaming. The new name we have specified in this example is “Hyper-VTeaming” as shown in the following screenshot:
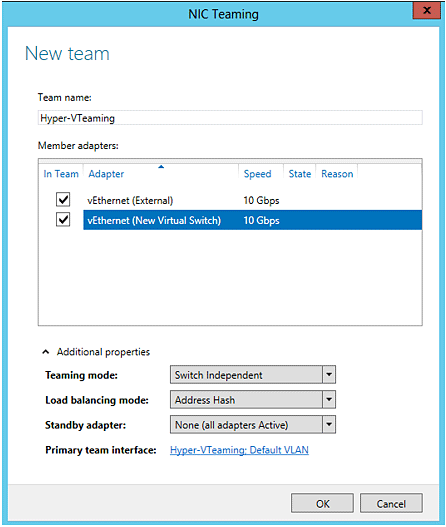
- Under “Additional properties,” you can configure the options such as Teaming Mode, Load Balancing mode and Standby adapter. Teaming Mode allows you to choose one of three teaming modes available — switch independent, static mapping, and LCAP. Virtual machine teaming can only run in the Switch Independent Mode and you also need to make sure to select “Address Hash” mode under the Load balancing mode or else teaming will not work.
Note: You can always modify the teaming options at a later stage or delete the teaming by going to the “Properties” page as shown in the screenshot below:
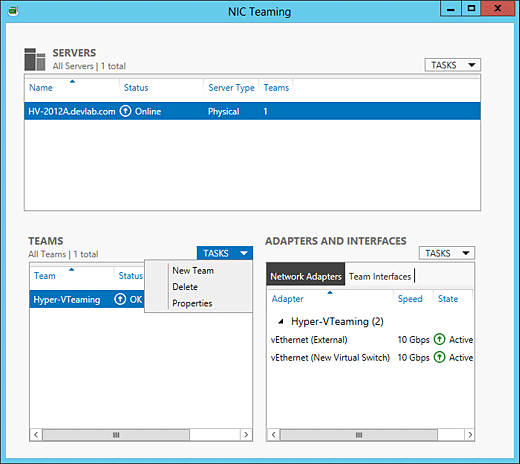
Click on OK once you are done configuring the different options
The newly created teamed adapter will be available in the “Network Connections” page in the Control Panel as shown in screenshot below.
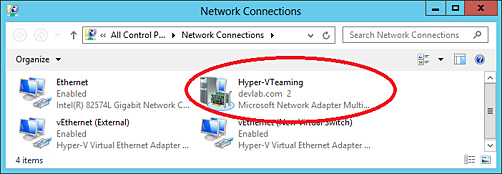
Note: At this point, since the teamed network adapter will be used by the network services running on the virtual machine, you need to configure the adapter with required TCP/IP configuration information, including the IP address, subnet masks, DNS Servers and so on.
Nirmal Sharma is a MCSEx3, MCITP and Microsoft MVP in Directory Services. He has specialized in Microsoft Technologies since 1994 and has followed the progression of Microsoft Operating System and software. In his spare time, he likes to help others and share some of his knowledge by writing tips and articles on various sites and contributing to Solution IDs for www.Dynamic-SpotAction.com. Nirmal can be reached at [email protected].

