If you’re deploying Hyper-V and virtual machines, key choices must be made to ensure your environment is secure. This article will explain how to configure Hyper-V security using Authorization Manager, what to secure and what to look at. It will also examine Hyper-V security best practices and offer examples on how to implement Hyper-V security using Authorization Manager.
Most of this article talks about Hyper-V security. It assumes, therefore, that you have a working Hyper-V server in your environment. It does not explain how to create and configure virtual machines on Hyper-V. Instead, the article focuses on how to provide security to virtual machines running on Hyper-V and how to implement a secure Hyper-V environment and best practices.
Terms Used Throughout This Article
Parent Partition: A Windows Server 2008 running Hyper-V role is called the Parent Partition. Parent Partition is responsible to create Child Partition and also controls the communications between all the virtual machines.
Child Partition: A virtual machine running on Hyper-V Server is called the Child Partition. A Parent Partition creates the Child Partitions.
Authorization Manager: Authorization Manager provides security to the resources. Hyper-V leverages the Authorization Manager to provide security to virtual machines.
The first task of an IT administrator is to provide the security of infrastructure servers before they are actually implemented in the production environment. Hyper-V is one of them. Most IT administrators do not know how to implement a secure Hyper-V environment. This is chiefly because Hyper-V is new to the virtualization world. On other hand, VMware has been involved with virtualization for several years. New technology will always differ from its competitors. As an example, VMware uses Monolithic VMM Architecture, whereas Hyper-V uses Microkernelized VMM Architecture. The difference could be in security architecture as well.
That is where this article is useful for IT Administrators interested in knowing how to provide security to virtual machines running on Hyper-V and Hyper-V in all.
Hyper-V does not ship with a built-in tool that can be used to secure a virtual machine. Instead, it uses a Windows component called Authorization Manager to provide the security for virtual machines and Hyper-V. The Authorization Manager ships with Windows Server 2008 enabled by default. Security involves each and every aspect. As an example, securing operating systems involves securing operating system files (e.g., DLL, and OCX). Similarly, for Hyper-V you should know what to secure when it comes to secure your Hyper-V and virtual machines (e.g., are you planning to secure virtual machines or the overall Hyper-V environment?)
Securing virtual machines do not involve much administrative overhead. You just need to know how to use Authorization Manager and perform a couple of tasks to provide security. To provide security to overall Hyper-V environment, you must know everything about Hyper-V. You need have an idea on where Hyper-V copies all its files, what all ports are opened for different services running on Hyper-V and the default configuration of Hyper-V.
We will discuss the below-mentioned topics in detail in this series of article:
- Hyper-V Default Configuration and Securing Files and Folders
- Virtual Machine and NTFS Permissions
- Hyper-V Services Overview & Security
- Hyper-V Firewall Rules and Configuration
- Securing Hyper-V & Virtual Machines using Authorization Manager
- An example to provide Hyper-V Security using Authorization Manager
- Hyper-V Security Best Practices
Hyper-V Default Configuration and Securing Files and Folders
It is necessary to know the default configuration of Hyper-V. First, we will look at securing the folders that contain virtual Machine VHDs and the Configuration files (XML).
When you initially enable Hyper-V role on Windows Server 2008, it creates a few directories and copies many files in it. It is necessary to understand the default location for storing virtual machines and configuration files before you can tighten the security for Hyper-V.
%SystemRoot%ProgramDataMicrosoftWindowsHyper-VVirtual Machines
%SystemRoot%ProgramDataMicrosoftWindowsHyper-VVirtual Hard Disks
%SystemRoot%ProgramDataMicrosoftWindowsHyper-VSnapshots
By default, Hyper-V uses the above directories to store the virtual machine configuration files, VHDs and the snapshots associated with the virtual machines. You must change the default location before you move Hyper-V to the production environment. It is recommended to change the default location for storing VHDs, XMLs and Snapshot files to a SAN drive.
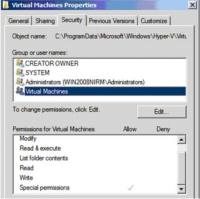
When you install Hyper-V Role, a special security group called “Virtual Machines” is created. This security group contains GUIDs of all the virtual machines registered with the Hyper-V Server, and it has access to the
%SystemRoot%ProgramDataMicrosoftWindowsHyper-VVirtual Machines
folder, which stores the configuration files (XML Files) of the virtual machines. If this Security Group is removed or missing from the Security Tab of the virtual machines folder then you can’t access virtual machines running on the Hyper-V. The VMMS.EXE process, which is responsible for managing access to all the virtual machines, uses the “Virtual Machines” Security Group to gain access to virtual machines on Hyper-V Server.
By default, the Security Permissions on the
Hyper-VVirtual Machines
folder looks like:
 |
| Default Security Permissions on Hyper-VVirtual Machines Folder |
At a minimum, keep the below mentioned Security Groups on property of
Hyper-VVirtual Machines
folder:
SYSTEM Account 		-Full Control
	Administrators 		-Full Control
	Virtual Machines		-Special Permissions
By default, Hyper-V does not allow anyone to access virtual machines except the SYSTEM Account and the Local Administrators Account. This is very clear from the above figure. The Local Administrators Security Group is added to the policy store of Authorization Manager, and it is given full control over Hyper-V, including the virtual machines running on it.
The same security settings, shown in the figure above, apply to the Hyper-VSnapshots folder.
Tip: If you want to prevent users or Administrators from creating new virtual machines on the Hyper-V Server, remove the “Virtual Machines” special Security Group from
Hyper-VVirtual Machines
folder.
The next folder to secure on Hyper-V is the
Hyper-VVirtual Hard Disks
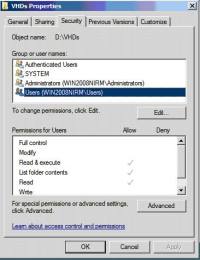
. It’s more important to secure this folder than the folder that contains the XML files because Hyper-V supports virtual machines in the VHD format. These VHDs can be used with earlier versions of virtualization software. An unauthenticated user who has read access to the VHD files can still copy the VHD file and use it with Virtual Server or Virtual PC. The default settings on
Hyper-VVirtual Hard Disks
look as shown below:
 |
| Default Security Permissions on Hyper-VVirtual Hard Disks folder |
To make security tighter for the folder that contains VHDs, you can remove the Users Security Group which is added when you initially enable the Hyper-V Role. At a minimum, you should keep the following Security Groups on the Security Tab:
SYSTEM - Full Control
Administrators - Full Control
Authenticated Users - Read & Execute

