Microsoft released the initial version of PowerShell Desired State Configuration (DSC) way back in August of 2013. It shipped with Windows Server 2012 R2 and Windows 8.1 to provide a foundation for creating and maintaining the configuration of both server and desktop machines. The primary purpose of DSC is to maintain a known or desired configuration state based on a set of requirements.
Desired State Configuration (DSC) is a PowerShell-based feature “that enables deploying and managing configuration data for software services and managing the environment in which these services run,” 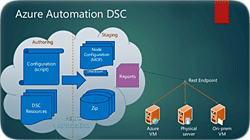 according to Microsoft.
Extending this capability to Azure is simply a natural progression. Azure Automation DSC “allows you to author and manage PowerShell Desired State Configurations, import DSC Resources, and generate DSC Node Configurations (MOF documents), all in the cloud,” states the Azure web site.
Microsoft has made PowerShell a foundational piece of their management story across its entire product portfolio. In August of 2016, Jeffrey Snover announced PowerShell was being open sourced and made available on Linux.
This opens up a huge opportunity to manage all systems in a data center with PowerShell. It also establishes PowerShell as the single ubiquitous, cross-platform, scripting language specifically designed for administrative automation.
Basic Configuration Steps
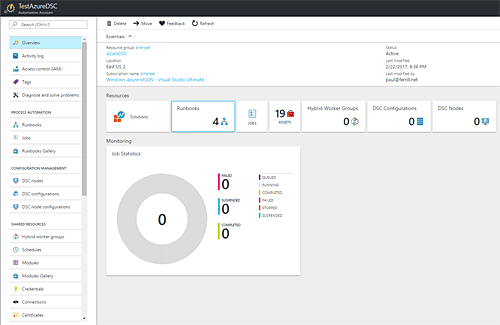
Azure Automation DSC requires an automation environment to accomplish its tasks. This typically corresponds to your specific system configuration, although you can test out the capability using a sample environment.
Microsoft offers a GitHub repository with a PowerShell script that will download and configure everything you need. This script takes advantage of an Azure Resource Manager (ARM) template to get the job done.
Configuration files use basic syntax that looks a lot like PowerShell. Here’s one of the examples provided by Microsoft to configure a server as a Web server:
configuration TestConfig
 {
     Node WebServer
     {
         WindowsFeature IIS
         {
             Ensure               = 'Present'
             Name                 = 'Web-Server'
             IncludeAllSubFeature = $true
         }
     }

     Node NotWebServer
     {
         WindowsFeature IIS
         {
             Ensure               = 'Absent'
             Name                 = 'Web-Server'
         }
     }
 }
This code must be uploaded to the Azure portal and compiled before use. Azure Automation DSC supports the management of virtual machines running on Azure, Amazon Web Services (AWS) or in your local on-premises data center.
You can manage physical machines as well with the same mechanism. Host or virtual machines must be running Windows Server 2008 R2 or later or any of the supported Linux versions.
Adding an Azure VM as a DSC node is the easiest task of all. Figure 1 shows the DSC Nodes page with the option Add Azure VM selected. The remaining steps required include selecting one or more virtual machines followed by configuring the registration data.
Default settings work for most nodes and allow you to change things such as refresh and configuration mode frequency should you so desire. Once those details are complete, click the OK button, and the VM will be added as a DSC Node.
Azure Portal Basics
Runbooks are automation scripts that execute within the Azure platform, performing various tasks. Azure Automation currently supports four different types of runbooks including Graphical, Graphical PowerShell Workflow, PowerShell and PowerShell Workflow.
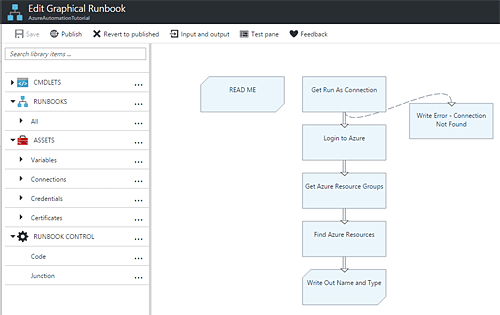
Both Graphical types must be authored on the Azure platform and may require some PowerShell scripting to perform more complex steps. Figure 3 shows the AzureAutomationTutorial Graphical Runbook.
PowerShell runbooks are made up entirely of PowerShell commands and will work on any platform that supports PowerShell. This now includes Linux and Mac platforms with the open source release of PowerShell.
A runbook job is created each time a specific runbook is executed by an Azure Automation worker. To launch a Runbook, simply select it from the list of runbooks and then click on the Start button. Progress can be monitored from the Jobs blade for the Runbook.
Live Testing
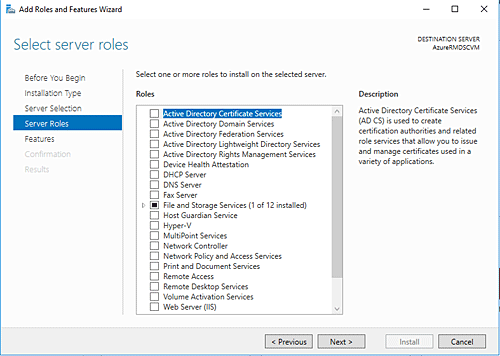
To test this capability we downloaded a remote desktop profile for the new VM and connected using Remote Desktop. Figure 4 shows a snapshot of the Windows server roles page on the AzureRMDSCVM.
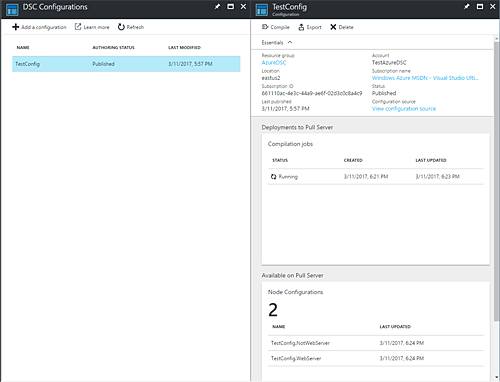
At this point the Web Server role has not been installed. In order to deploy the Web server configuration we have to first compile the PowerShell script into a MOF file. This step requires clicking on the Compile button from the DSC Configurations tab. Once the compilation job completes you should see a Node Configuration available on the Pull Server (see Figure 5).
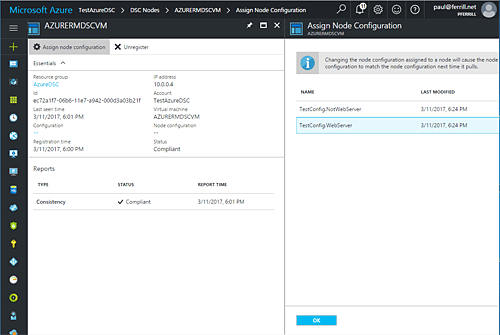
All that’s left to do at this point is to apply this configuration to our Azure VM DSC node. Figure 6 shows this page and the two available configurations to either enable or disable the Web server.
Selecting the second option and clicking OK will start the process of applying our configuration to the VM. At this point you will see Pending in the status box for this VM until the configuration has been applied and verified. To make sure everything worked as expected, we logged back into the remote desktop session and confirmed the presence of the Web Server role.
Wrap Up
Microsoft has delivered a powerful configuration management tool in Azure Automation DSC with the ability to control systems in Azure, Amazon AWS and on-premises. You can sign up for a trial Azure account and give this new capability a spin. It’s definitely worth your time.
Paul Ferrill, based in Chelsea, Alabama, has been writing about computers and software for almost 20 years. He has programmed in more languages than he cares to count, but now leans toward Visual Basic and C#.


